Showing posts with label Die inlays. Show all posts

Sunday, 30 January 2022

Snowflakes


I love to follow a good simple sketch and there is one such at CAS Colours and Sketches this week. Here is it!.


I couldn't decide whether I liked it better with or without the sentiment.
I began by embossing a Kaisercraft background stamp onto black card and embossing in white EP. Then I cut around the edge of the design at the bottom and die cut the top to fit my card panel. Next was to inlay the lower snowflake into the embossed card. There is a plain snowflake on the top,  a more elaborate snowflake which is stacked and then embellished with a few pearls.


Friday, 13 August 2021

Birthday WIshes

I have had this die by Paper Rose for some time but this is first time that I have used it. I began by cutting three layers of the tulip frame and stacking them. I then embossed an image onto a piece of card to see where I should add colour, which I did with two shades of Distress Oxides in pink... Worn Lipstick and Spun Sugar and one in green... Bundled Sage. Once I had coloured it, I sealed it with some clear Ranger Distress Glaze and then die-cut the coloured pieces and inlaid them into the frame die cut..
I happen to have several sets of dies from Presscut and there are 30 odd circles in this particular set, increasing  very gradually in size, so I was able to find one which matched the diameter of the Paper Rose die to make the aperture behind it. I stamped a few splatters on the base card and then popped both that and the frame onto dimensional pads. 
The sentiment is by Mama Elephant.


Keep it simple

Full Circle


Friday, 9 July 2021

Happy Birthday


Here I began by inking a background with a couple of shades of Distress Oxide inks and then heat embossing a WOW background stamp in silver. From this I cut the butterfly die, plus 2 more from white card. I stacked the white die-cuts and inlaid them with the inked versions. The frames of each butterfly are quite flimsy, so in order to get them stuck to the card front accurately, I dry embossed the die into the card to give me the exact position for securing outlines. This meant that all the inlays fit perfectly.


Wednesday, 30 June 2021

Happy Birthday

Here I used a little more of the distressed shaving foam technique print, (which I used on the card in my last post) but sadly picked a background stamp to emboss over the top which was too busy, so you actually can't see too much of the blues beneath...But I thought I would use it anyway!
I took a strip of card and die cut the tips of the butterflies' wings from it then dry embossed it. I cut two butterflies from the blue/gold embossed card and popped them into the gaps, adding bodies and a sentiment.


Do butterflies count as critters? I guess they might!

Here is another card made with a similar layout, similar shaving foam print and similar technique of partially inlaying the dies. This is my attempt at the Photo inspiration at Just Us Girls.


I think it's quite a tricky one! The DT inspiration is awesome... do take a look!

This card base is one of the two different types of linen-y card that I'm using to try to replace the one that Paper Mill Direct has ceased producing... much to my chagrin. This one is from Amazon.


Wednesday, 16 June 2021

Noel


I am really loving the dies I purchased from Simply Graphic and these gift dies are part of yet another set. The fourth gift is a circle and I wasn't quite sure where I could have placed that one.  The sentiment is from a different company and for the life of me I can't remember which one!
I guess that these parcels could be used for any occasion when gifts are given, but I thought that the addition of a tiny sprig of holly added to the seasonal nature!
The front parcel was popped onto dimensional pads and the sentiment stacked 4 times with the 'l' of the lowest layer removed so that it sat evenly over the edge of the tall parcel.


Friday, 11 June 2021

Nautical Birthday


Here is a card made with a new die from Simply Graphic. I love this company and would love to buy heaps more products, but I must pace myself! 
It is reminiscent of The Great Wave of Kanagawa a woodblock piece of art by Katsushika Hokusai. I tried doing a watercolour version in a class onboard Queen Elizabeth on our cruise from Japan to Vancouver. I didn't do very well! This doesn't have Mount Fuji in the distance or the boat riding the waves, but I find it quite a calming image, despite the ferocity of the sea.
After cutting out the die I water coloured the sky using little Stormy Sky Distress Oxide ink mixed with water, creating the clouds by dabbing a piece of dry paper towel into the wet paint. I coloured the other sections of the die cut with deepening shades of Distress Oxides towards the bottom. and added some speckles for the foam with Dr Phil Martin's Bleed Proof White.
Since having my new kitchen, the induction hob has been not quite right. When I pressed for the front right zone to be used, the back right zone would be selected. I could alter it to the correct one, but it was irritating that it wasn't working as it should. After a second visit by an engineer, today it was finally fixed! Hurrah!

Watercooler Wednesday - All things masculine


Monday, 16 March 2020

Leafy Birthday


I don't seem to have had lots of inspiration lately, but finally I've produced a card which I think is OK.  I used a die by Alexandra Renke cut from a piece of card which had a print of some smooshing, using Inka Gold and Aquatint inks. I couldn't find one tiny piece of leaf when doing the inlay and  so decided to leave another piece out to make it look intentional! Behind the aperture is a download of some newsprint. The sentiment is from Avery Elle.
It looks like we may be 'confined to barracks' for 4 months as we are both over 70. Fortunately I have crafting to fill my time and hopefully the weather will improve so that we can spend some time in the garden. I hope that the supermarkets will have sufficient grocery delivery slots for everyone!
Here are the challenges which I am linking this card to.


Use Some Green
Stay Well Everyone!

Saturday, 4 January 2020

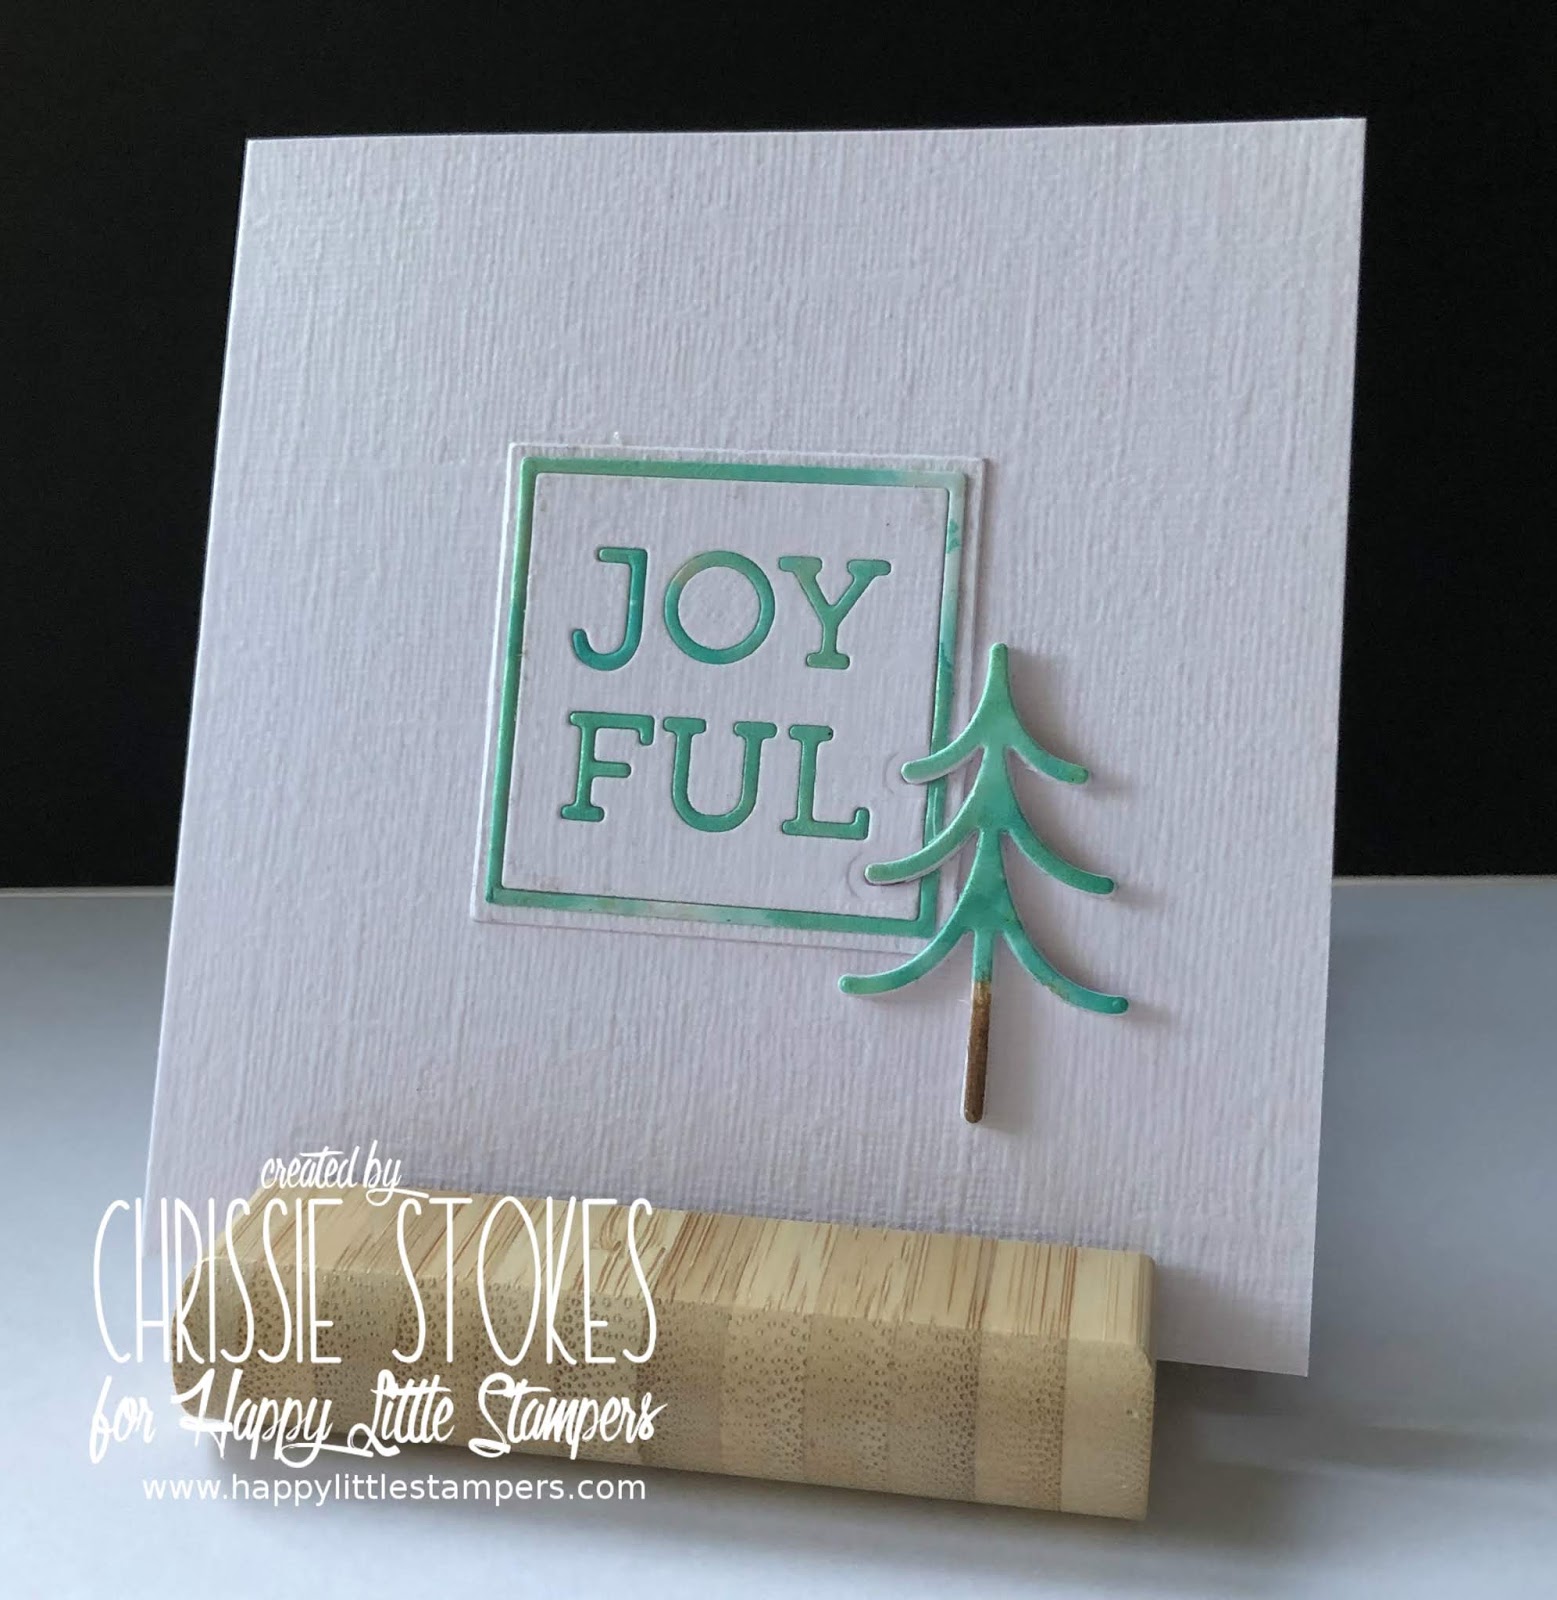
Joyful


I thought that this last year I was well ahead with Christmas card makes, but what with the ones that I sold at my choir to raise choir funds, requests from friends for sets of cards and ones for personal use, I had to start on a last minute production line once more. This year I will try to do better.
This is a very small card, about 10.5 cms square with which I used inlaid dies. Firstly I coloured a piece of card with Brusho and mica powder and  spritzed with water. When dry, I die cut the pieces and also cut a set from plain white card. The joy of this technique is that you end up with a positive and a negative so making two cards instead of one. The tiny tree is layered several times, so as it wouldn't sit neatly overlapping the plaque I die cut a space in the SSS die-cut for it to sit in.

It's such a good idea to join in with Christmas challenges throughout the year, so that you have a ready supply when required, so do join us at Happy Little Stampers!

Thursday, 2 January 2020

CAS Watercolour Guest Designer


Loll and Bonnie must put in hours of work to make their Challenge Blogs so informative, interesting, stimulating, challenging and downright fun!
The Watercolour challenge this time is to use Cool Colours and I am simply delighted to have been invited to be a Guest Designer for this challenge


For my card I began by stamping a My Favorite Things background stamp with Versamark and embossing in Silver.
I then spritzed it with water and added some sprinkles of Brusho powders and spritzed some more, dabbing with a paper towel and adding more powder and water until I got an effect which I liked. I then dried it off with my heat tool.
This kind of card always makes two versions.... the negative and the positive. I cut the SSS Tulip die from the centre of the coloured, embossed  card and then three or four layers from white card, which I stacked and then inlaid the coloured sections from the first cut. 

This is the card which I made with the remaining die cuts. I recessed the tulip die-cut and added a dry embossed backdrop for it, to add a little interest. I chose a folder with similar lines to the die cut and the original stamping. Not quite so CAS as the first card but still has fairly clean lines. The frame is mounted on dimensional pads.


Sunday, 17 November 2019

Thank you!


I think it's rather nice if the sign of appreciation, in some way, matches the deed for which the recipient is being thanked.
The choir with which I have been singing for some 36 years, puts on concerts 3 or 4 times a year. At most of these concerts we have wine and soft drinks served in the interval... (often makes for a jolly second half) and the person who has been serving these drinks for many years, has decided that he needs a break. We are so grateful for all his hard work and this is the card I made to accompany our thanks!
I chose a burgundy backdrop and inlaid the die with plain white card and some of the deep red. We sang a concert of Mozart and Haydn last night, which was really enjoyable... I must say the wine in the interval was really welcome and its server much appreciated.

CASology - Appreciate

Wednesday, 16 October 2019

Maple leaf

Here is another watercolour Maple leaf card. I used Aqua tints again for adding colour to the die cut leaf, leaving the others inlaid with a contrasting, textured white card. After spritzing with water and drying with my heat gun, I smeared just a little gold brilliance ink here and there, just to warm it up a little.
The die cut sentiment is from Penny Black... I think the leaves are from Memory Box, but can't exactly remember!
CAS  Watercolour - Maple Leaf

Saturday, 31 August 2019

Hello


This seems a good title for a blog post today, as I haven't said hello to my craft room in about a week whilst we were entertaining two of our grandchildren for the last full week of their school summer holidays. The time has been spent visiting a National Trust property at Petworth, Jane Austen's House at Chawton, The Mary Rose  in Portsmouth Dockyard and the obligatory visit to a local toy store! I also taught them both to knit... one more successfully than the other I hasten to add
Today however, is for relaxation!

Anyway this card came about when I saw the challenge at TIMEOUT
.
As the challenge is sponsored by Winnie & Walter, the colours of their logo made me want to emulate it, so I chose a background stamp from Kaisercraft and inked it with similar rainbow colours.... these are tiny dots rather than the huge circles of the logo.
I used one of their In a Word Cutaway dies. I have a few of these and love how bold they are. I'm not even sure if they are still available. Anyway I decided to layer this and inlay the die cuts. The sun is from a die from Lawn Fawn, layered and popped onto dimensional pads. I quite like the muted effect of the colours.
Now for a little catching up on crafting!

Tuesday, 20 August 2019

Memory Box Challenge


I just found a new (to me) challenge called Outside the Box, which is part of Memory Box. As many of you know I love die cutting and Memory Box is one of my favourite companies, so I just had to have a go!
The challenge this time is Warm Colours
Monthlythemebadge
To make the card I simply cut the front panel with the solid butterfly die and cut the top layer of filigree butterflies from a separate piece of card. I coloured the backdrop with Distress Inks, applied with sponge daubers. The filigree butterflies were then inlaid into the gap and the sentiment from Altenew stamped beneath it! I think I may add a little pearl to each body.. I think it needs just a little something!

Friday, 16 August 2019

Nautical Twofer


It's time for another Twofer over at Darnell's blog. I find these challenges really ... what shall we say? .... challenging!
The theme  this time is Nautical
 

For the landscape card, I used a stencil from Neat & Tangled called Rice Paddies and I love it. With this I used some home made embossing paste and it worked beautifully. I had added some extra PVA glue to the mix and it was much better. 
Here is my amended recipe
  • 1/2 cup of talc
  • 1 tablespoon of White Acrylic paint
  • 2 tablespoons of PVA Glue
After I had masked and spread paste over part of the stencil, I removed it from the card and sprinkled over some WOW Vintage Peacock embossing powder. I waited until it had dried out somewhat before heat setting. It was a fabulous twinkle.


The silver heat embossed sentiment is from The Alley Way stamps. I simply added a whole shoal of little silver die cut fish.
Freshly Made Sketches


The second card uses the same fish over an ocean daubed with Distress inks, and stamped with some white acrylic paint grunge dots. It's topped with a die by La La Land Crafts of Sea Bubbles. The sentiment here was computer generated. As I inlaid this die, I still have the negative die cut to use on another card!
What fun!

Saturday, 10 August 2019

More die cuts


A quick card for a couple of challenges.
Simple die cut dog and cat and a stamped  sentiment from Altenew, all popped onto a raised panel. 
Make it Monday - Friendship
AAA Cards Make it in Minutes


This one is for the challenge at The Male Room where they are having a celebration to commemorate 6 Years... quite an achievement! Congratulations girls definitely worth raising a glass or two!
Bit of a die cutting bonanza today!