Showing posts with label Brusho. Show all posts

Wednesday, 4 March 2020

Good Luck


I loved this little chap from SSS from the very first time I saw him... I do have his rather larger chum too, but this one is my favourite.
Here I coloured him with Brushos.. after die cutting, I sprayed the bits of card for his clothes with water and tapped on some Brusho greens. I love to see how the colour moves around. I did some scarlet for his nose and left his beard pristine! When dry I stuck the bits to the base die-cut and covered with some Nuvo Crystal glaze.
I dry embossed a Cuttlebug Border EF across the front panel and added a sentiment from Sugar Pea Designs.
I used the layout from CAS(e) this Sketch

and the theme from CAS Watercolour

Saturday, 4 January 2020

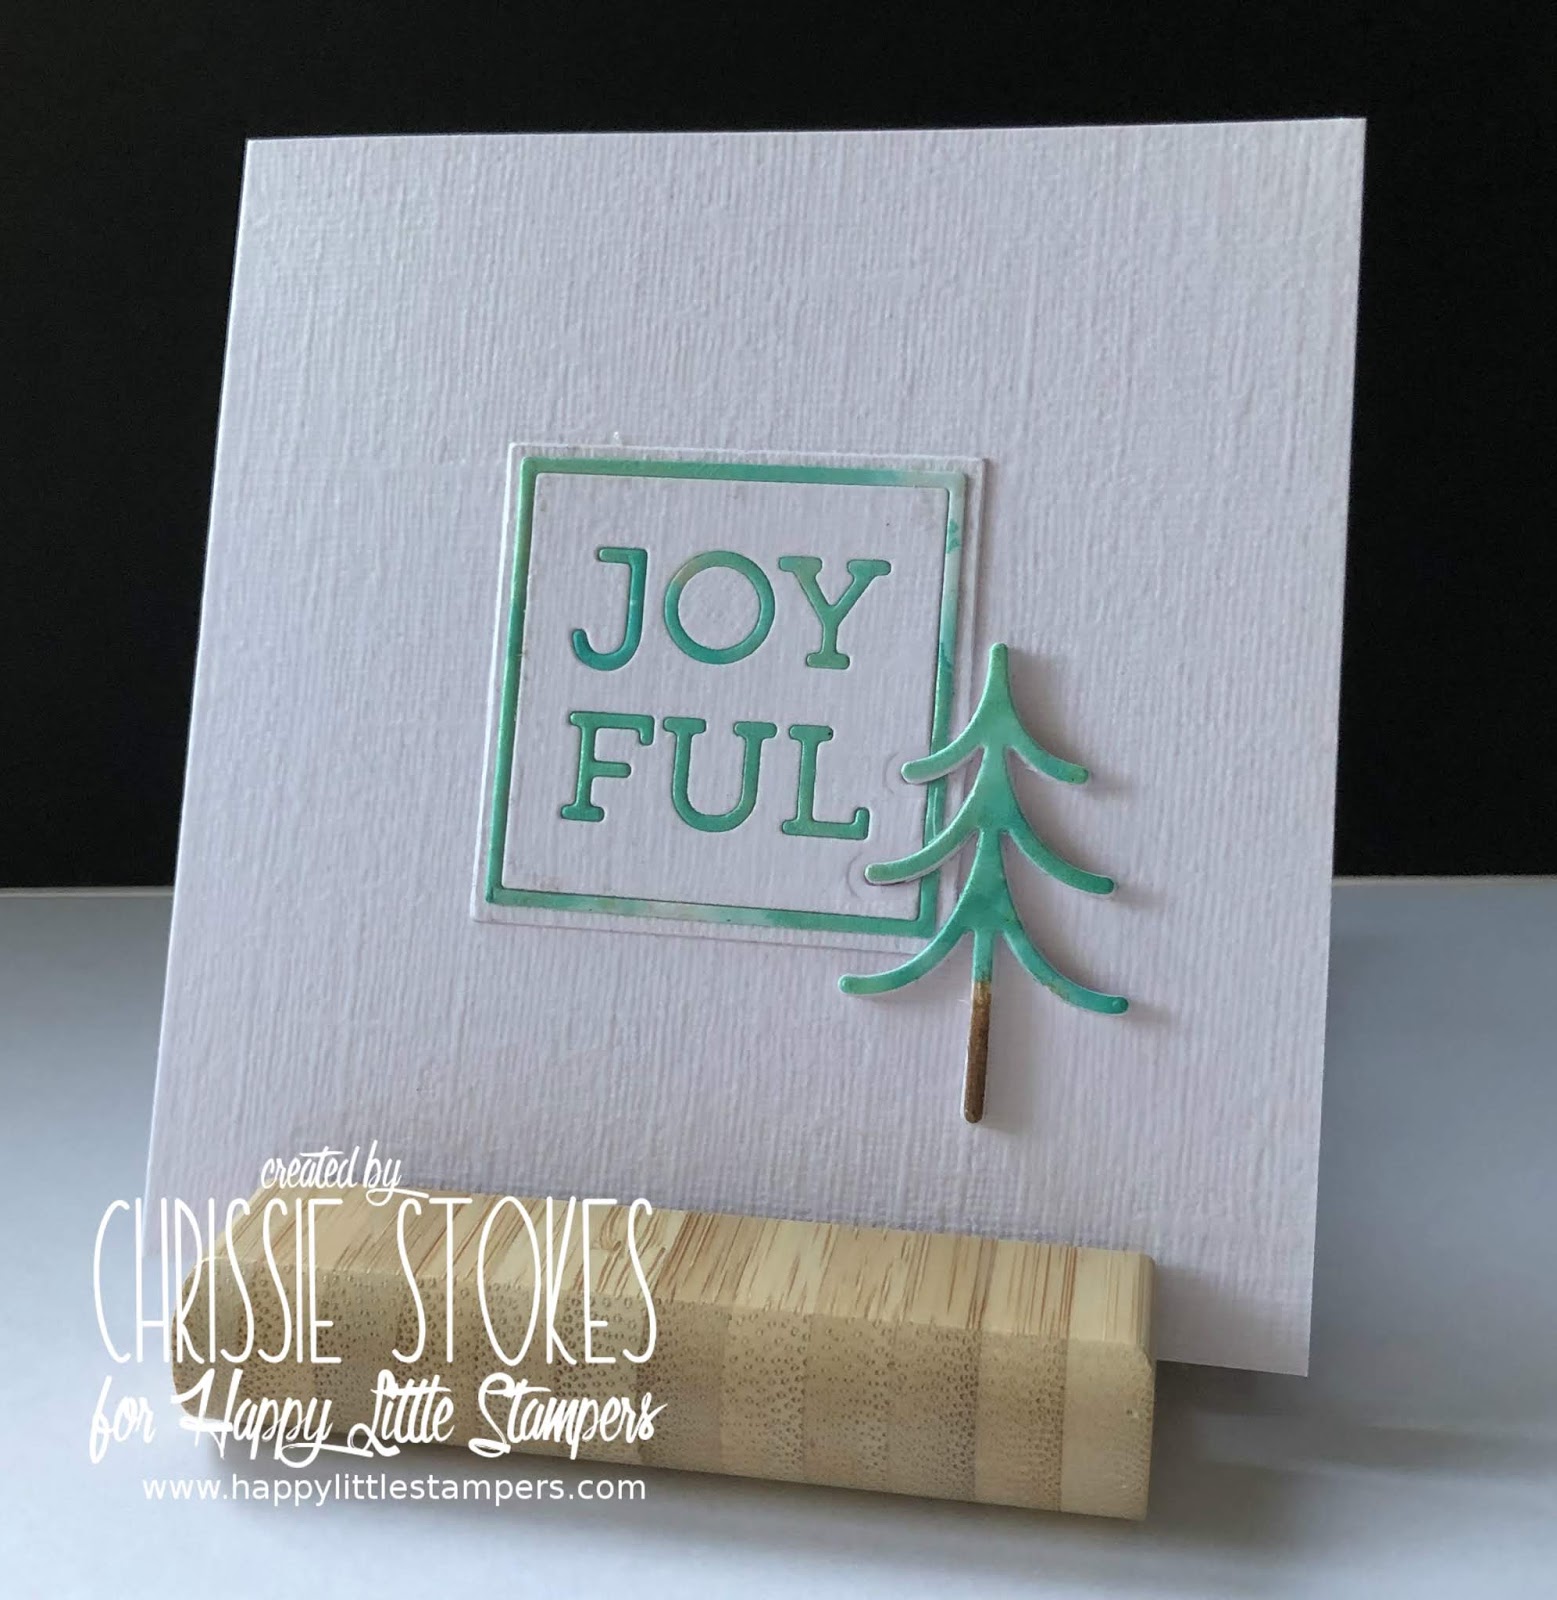
Joyful


I thought that this last year I was well ahead with Christmas card makes, but what with the ones that I sold at my choir to raise choir funds, requests from friends for sets of cards and ones for personal use, I had to start on a last minute production line once more. This year I will try to do better.
This is a very small card, about 10.5 cms square with which I used inlaid dies. Firstly I coloured a piece of card with Brusho and mica powder and  spritzed with water. When dry, I die cut the pieces and also cut a set from plain white card. The joy of this technique is that you end up with a positive and a negative so making two cards instead of one. The tiny tree is layered several times, so as it wouldn't sit neatly overlapping the plaque I die cut a space in the SSS die-cut for it to sit in.

It's such a good idea to join in with Christmas challenges throughout the year, so that you have a ready supply when required, so do join us at Happy Little Stampers!

Thursday, 2 January 2020

CAS Watercolour Guest Designer


Loll and Bonnie must put in hours of work to make their Challenge Blogs so informative, interesting, stimulating, challenging and downright fun!
The Watercolour challenge this time is to use Cool Colours and I am simply delighted to have been invited to be a Guest Designer for this challenge


For my card I began by stamping a My Favorite Things background stamp with Versamark and embossing in Silver.
I then spritzed it with water and added some sprinkles of Brusho powders and spritzed some more, dabbing with a paper towel and adding more powder and water until I got an effect which I liked. I then dried it off with my heat tool.
This kind of card always makes two versions.... the negative and the positive. I cut the SSS Tulip die from the centre of the coloured, embossed  card and then three or four layers from white card, which I stacked and then inlaid the coloured sections from the first cut. 

This is the card which I made with the remaining die cuts. I recessed the tulip die-cut and added a dry embossed backdrop for it, to add a little interest. I chose a folder with similar lines to the die cut and the original stamping. Not quite so CAS as the first card but still has fairly clean lines. The frame is mounted on dimensional pads.


Thursday, 19 December 2019

Joy to the World

Sometimes when I decide to colour die cuts, I begin by inking some card and then choosing the spot I would like to die cut. This time I began by cutting out the dies and then spritzing them with water before sprinkling with Brushos and then spritzing again. The smaller pieces I just dabbed into the residue of colour left on my craft mat. It's not any special card, just a bunch of off cuts. 
I knew that I wanted to have the word JOY in  the centre of the wreath, but didn't like any of the dies in my stash, because of size or style or whatever, so decided to make one with my Silhouette. I'm not exactly sure which Font I used but I chose one with a serif so that there would be areas which would make the welding of the letters together a little easier. I cut three and layered them before triple embossing in gold. You can see where the serif of the 'Y' joins to the 'O'. I like to weld the letters into a complete word as it's so much easier to deal with a whole word, rather than trying to stick down individual letters.
I didn't intend having the diagonal trail of tiny pearls, but a teeny smidgen of ink forced my hand!
I did just drag the leaves over a gold ink pad before attaching to the card.
Christmas Kickstart -  Last minute Madness
MOD Squad - Christmas or Winter
Paper Funday - Christmas
CASology  - Branch
Just Add Ink  - Photo inspiration

Wednesday, 18 December 2019

Delicate leaves

Today I was watching a video of Jennifer McGuire using Shimmer Powders and loved the effect she was achieving. I don't have any shimmer powders, but I do have some Brushos and some Mica powders, so I thought that I would combine the two to see if I could achieve a similar, shimmery effect. I rather like the delicacy of this one It's a couple of shakes of Green Perfect Pearls and Leaf Green Brusho, spritzed with water and allowed to dry. I didn't use any special watercolour paper, just some offcuts of card on the non textured side.
The branch die is by Alexandra Renke. I'm not sure of the sentiment die... it's very old. I cut a panel for it to rest on, from a pennant die, cutting part way from each end, to make a rectangle just long enough to accommodate the letters.
CASology  - Branch

Just Us Girls - Anything Goes
Inkspirational - No Stamping

Saturday, 3 August 2019

Final butterfly card

Here is my third and final card for the CAS Watercolour challenge this month. I've had great fun with this challenge and have tried all sorts of things which didn't work and a few that did!
For this one I cut a large Memory Box Butterfly  from card and once I had taken out all the little insert bits, I put it back into the card I had cut it from, to use as a stencil! I then tapped a few colours of Brushos over it and sprtized liberally with water... probably a bit too much but I still quite like the effect... and I have a fab, messy bit of paper towel to use for another project!!!!
I simply added a bunch of sequins randomly over the image, cut it down to size and mounted it with a stitched die cut frame. The sentiment is from MFT.

Brusho Butterfly


The CAS Watercolour challenge is to create a colourful butterfly.
 
To make this card I used a Sweet Poppy stencil with some Pearlescent White embossing paste. Once I had lifted the stencil, I tapped a few grains of Brusho colours over this in Turquoise, White, Ultra Marine and Cobalt Blue. After waiting for a few moment for the colours to mix the with paste, I then spritzed with water. Over this a sprinkled a little Gold Glamour Dust and left it to dry.
The sentiment is from an old Magenta stamp simply embossed in Gold and cut with a tiny stitched rectangle die. I had to extend this by just a couple of stitches in order to fit around the image completely.
I'm really fond of butterflies for cards so I may be trying another card very soon!

Monday, 10 June 2019

Watercolour die cut

I find something really serene about this die cut flower from Sizzix. I coloured it with Brushos and love to see the reaction when water is added. Some shades seem to separate into several component colours and I think the effect is fascinating! Simplicity itself.
The sentiment is from Clearly Besotted. 

CAS watercolour Something Blue

Sunday, 17 February 2019

More Triple Embossing

Whilst I was doing a little triple embossing the other day I decided to use a few other die cuts and stamps.
My Sizzix leaf was cut and triple embossed in black EP, then a few shades of Perfect Pearls added over a layer of Versamark. After reheating I stamped into the molten liquid really heavily with a Large Tim Holtz stamp inked with Brilliance gold ink.
The background grid stencil was made by cutting a piece of vellum with a Memory Box Distressed Collage die. I placed the stencil over a piece of card and tapped out  few grains of Dark Brown and White Brushos before spritzing with water and dabbing dry with a paper towel. The berry spray die was the least fussy of the ones in my die store but I'm not exactly sure of its origin, I know I had to add two shims before it cut cleanly. I have quite a few of these kind of dies, I guess I'm attracted to them ...(berries not ones which need to have a shim)!
The sentiment is from Clearly Besotted, stamped with SU Chocolate Chip ink to match the dark brown card Base.
It's for a few challenges
CAS Stencil Challenge - Use Powdered Inks

CAS Mix Up Challenge - Dimensional Die Cuts


It was fun making this card, I need to try to use lighter colours on the die cuts next time!

Monday, 12 June 2017

Having fun!

Since attending the Happy  Little Stamper's Craft retreat last year, I have really become a Brusho convert!
This card is a bit of an experiment and I had fun doing it.
I began by applying some White Pearlescent Embossing Paste through a stencil and then having removed the stencil, tapped some Brusho colours onto the wet paste. It began to react a little but I fancied a little more impact so I spritzed it with water and blotted it a little.
The pearlescence shows through the colours and I rather like the effect!
The sentiment is from Paper Smooches, stamped in SU Pacific Point ink.
I'm submitting this card to two challenges
CAS Mix Up  (my additional  choice is die-cutting) and Just us Girls


Here is another using a similar technique, although this time I cleaned the stencil and put it back over the embossed images before adding the Brusho pigments. The pearlescence didn't show as much so I brushed a little Perfect Pearls over the butterflies and then decided to do a little spritzing as well.
The dry embossing is from a Cuttlebug folder.
Do you have a preference?


Tuesday, 9 May 2017

Love Brushos!

Since experimenting with Brushos at the retreat organised by Kylie in Swindon last year, I've had such fun experimenting with the wonderfully vivid colour combinations. Here the card was spritzed with water and several powders sprinkled over it before spritzing again and allowing to dry.
The butterflies were cut with an All Occasion die and mounted on a piece of card embossed with a Sheena Douglass EF, which in turn was placed on a square, cut with an MFT pierced square die.
The 'birthday' is from a Papertrey die and inlaid, the 'wishes' is from Craft Essentials Creative dies and overlaid.
A few tiny gems complete the picture.
It's for the challenge at Happy Little Stampers
Anything Goes with Dies


Plus the challenge at CASual Fridays, where their 6th birthday celebrations are approaching. Hence the 6 butterflies!
Happy Birthday CASual Fridays

Sunday, 2 April 2017

Blend

This time the theme for the CAS Challenge at Happy Little Stampers is the cue word BLEND!


 In fact blending colour is one of the things I love to do and there are so many ways of doing it.
Here I used some Platinum Inka Gold, mixed with shades of blue Brusho powders, spritzed with water and smooshed around a little before taking a number of prints. I thought this made a great winter sky.
The tree die is from Memory Box and the sentiment from Sizzix, both of which have been twinkled with a little Glamour Dust. The 'Noel' has been stacked to give a little added dimension.


Sunday, 1 January 2017

Happy New Year from HLS


Happy Little Stampers has a new challenge for 2017 and it's Stencilling!


It seems that my craft room has seen little of me over the holiday and I really feel the need to get back into the swing of cardmaking.
This one again uses Darnell's Brusho technique,... taping down the stencil onto cardstock, sprinkling with various colours of Brushos and then spritzing with water. The excess water was soaked up with a paper towel.
The letters and number are from MFT , I believe that the stencil is from the Craft Workshop.
I would like to wish everyone a very Happy New Year!

Friday, 2 December 2016

Masking using stencils

The challenge at HLS CAS challenge this time is to use a favourite technique.

At the HLS Craft retreat this year, Darnell developed a super technique of using Brushos and a stencil!
She taped down a stencil, sprinkled Brusho powders over it, then spritzed with water, blotting the ink with a paper towel fairly quickly after wetting.
Here I used a Craft Workshop stencil and the finished effect was over-stamped with an HLS butterfly, then die cut with the matching die. The sentiment is from the same set and the branch was die cut with  a die from Impression obsessions.

The die set  has an additional tiny leaf motif too and so I added a few to the branch, not sure which I prefer.
Here is the original paper which I stencilled and gave the Brusho treatment to... there's still lots left for other projects!


Pick your favourite technique or product you used from the past eleven CAS Challenges.  Please share why it's your favourite or any tips you learnt while doing it.

Below is a list of our previous challenges.


Saturday, 1 October 2016

Turquoise and Lilac

It's time for another colour challenge at Less is More and this week it's the turn of turquoise and lilac!

I used these shades for Darnell's patented method of adding Brushos through a stencil, developed at the HLS retreat in Swindon earlier this year.
This stencil, from The Crafter's Workshop was purchased after I borrowed one from Kathy during that weekend, I think it's terrific. I love the tiny random circles.
The stencil was taped down over the absorbent card... (watercolour paper works best) then sprinkled with Brusho powder and spritzed with water, mopping up any excess with a paper towel. I used violet, white and turquoise. The flower die is from SSS the Love word from Wplus9 and the foliage from Memory Box... or it might be Poppy Stamps.
Apologies... the flower die is  Flower stack from Poppy Stamps!
Although this is not autumn colours it is for the Leaves challenge at Just us Girls !

To get the lilac in this one I blended some pink with blue distress inks using sponge daubers. It's a simple card made with the emboss resist method, stamping with Versamark and embossing with clear EP before adding the inks!
The sentiment was computer generated and the edge punch is from Martha Stewart.
 Additional tiny die cut butterflies are from All Occasion Dies.