Wednesday 29 September 2010

Clean & Simply blue

I love to watch the videos by Gina from Gina K Designs. As I was looking around her site today, I noticed a challenge with a Clean & Simple sketch. I haven't previously entered any cards for this challenge, in fact I hadn't realised that there was one, but having found it, I just had to have a go. The next problem was how to upload my picture so that it appeared in the correct place. What a difference a couple of apostrophes can make! I finally managed it however.
I love the techniques to be learned there, but sadly don't have any Gina K products as international postage makes the cost somewhat prohibitive!
This card uses a little Cuttlebug embossing and some of my new Darkroom Door images from the Friendship Flowers collection. They arrived just yesterday. I cut and embossed the circle and left the card inside the die for stamping. I stamped each image twice with Midnight Blue Stazon, without re-inking, to get the shadow effect. Stamping within the die ensures that a plain border is retained.
I was quite pleased with this one!

WOYWW

Good Morning WOYWWers!
Did you miss me last week?
I was having a few days break in Jersey and very pleasant it was too!
Here you can see my new ink-pad rack which arrived today. I'd got fed up with having a cascade of boxes falling down all over me whenever I tried to reach for an inkpad. This was in an enormous package, the sender obviously didn't want it damaged in transit.
This week I have done a little re-organisation in my craft room and got rid of a bunch of junk. (Mainly belonging to my son). The space I gained in the cupboard has been filled with my plastic drawers and I also got a hanging shoe rack to put some other odds and ends in beside them.
This has allowed me to move the small unit which was behind me on which I had my trimmers and which held boxes of paper and card, into the space vacated by the plastic drawers, giving me a little more room to move about! You can also see my new comfy chair, which I swapped in Staples when the old one started to split.
It's going to be much easier to get at the paper now, but I have to actually get off my backside to get it...either that or shimmy across in my whizzy chair!
If you haven't joined in the nosiness before, now is a good time to start. Head over to Julia's, the link is on my sidebar and get to see some workdesks worldwide.

Tuesday 28 September 2010

Backpack

I quite like fiddling around making little things like this, so I'm really grateful to the Just Us Girls Challenge for throwing a template challenge into the mix.
I got the tutorial from Splitcoast Stampers here, and printed the template onto the back of  a piece of card which I had previously printed with a Cuttlebug Spotty digi paper.
The tutorial called for magnetic clasps, but not having any of those, I used small Velcro circles as the fastenings for mine.
I'm not quite sure what I would use it for, but I think it's cute. (It's 10cms tall and about 7.5 cms wide!)
Crafty Ann's - Anything but a card

Lily of the Valley

I printed this image from Fred She Said, the sponsor of our 'Bloomin' Marvellous' challenge at The Creative Card Crew this fortnight, directly onto my Fred She Said Pinstripe digi paper, before colouring it with Copics. I haven't actually tried this before, but with a little white watercolour for the blossoms, it seemed to work quite well.
I used my Spellbinder tag a little differently on this card. I wanted the white to show up the delicate colour of the organza ribbon, which I'd coloured with my Copics, so I cut the tag in two and used it as a means to get the ribbon to run behind the image.
Once more I have used my gorgeous new Fiskars Upper Crest border punch and added a sentiment from Hero Arts.
I've had an email with a request for a couple cards this morning, so I'd better press on!
Tuesday Throwdown - Punches

Looks like autumn

Good morning all!
Here is my DT card for My Time to Craft where the theme this week is Looks Like Autumn. I made this card prior to the one with the single sycamore leaf a few posts back, but used the wastage from one of these leaves to make the focal element for that one. Waste not want not, as my old mum used to say.
I stamped the brown card with my Stampin' Up 'Friendly' background stamp, before die cutting the leaves with my Cuttlebug dies.  The sentiment is from SU's Sincere Salutations set.
This card has been rather a variation on an Autumn theme as I seem to have made quite a few in similar vein this year.
Hop over to MTTC and show us your Autumnal cards. There is a new rule now about combining no more than 3 challenges... somehow the cards seem more special if they are just for a select few!
Yesterday was spent in Bath looking after my granddaughter. It was Daisy and me and a portable potty - 'Potette' (used twice during the course of our shopping expedition). What a brilliant invention they are!
Her potty training is fairly well established now, and she's very good about letting us know when she needs to 'go'. She only seems to have accidents when she's totally engrossed in her play! Another milestone practically conquered.
Crafty Little Place - Autumn Dayz

Sunday 26 September 2010

Our Creative Corner Colour Challenge

Although I don't have exactly the right Stampin' Up colours, I think that the ones that I have used for this challenge at Our Creative Corner are fairly close.
The image is from hero Arts and the script background stamp is from Stampin' Up.
I stamped the image and distressed the papers with Stampin' Up Chocolate Chip ink, and coloured the ribbon with Promarkers to match the blue paper.
The corner is from Cuttlebug's Vintage set of dies.
I really quite like cards oriented in this way.
Tomorrow I shall be off to Bath to babysit my granddaughter for the day. My daughter is self-employed and is quite busy at the moment and so is in need of my services. I'm only too delighted to be able to help out!

Indian Summer

I decided to take the challenge at Penny Black this week rather literally. The theme is called Indian Summer and so I decided to stamp my fabulous Penny black 'Golden Leaves' stamp directly onto some Basic Grey DP from the Indian Summer stack. This was a gift from Sherry, a fellow crafter in the states and I love it. 
I decided to make the leaves look like their title and stamped the image with Versamark and then embossed with Stamp 'n Bond and finally added gilding flakes. I love the effect this gives.
I then used my Stampin'  Up French Script background stamp to add the gold writing. The beautiful punching along the bottom is from my Fiskars Upper Crest border punch.
It was difficult to find a sentiment stamp which was in a suitable font to match the background, but I think that this one from Create and Craft fits perfectly.
A little bow made with my bow maker and the job was done. I hope you like it.
Penny Black - Indian Summer
MAWTT - 3 things from the list... Glitter, Heat embossing, Leaves
Keep it Simple - Gold Dust

Saturday 25 September 2010

Studies in shades of brown

I have been tidying out the cupboard in my craftroom today. It was full of boxes of 'stuff' belonging to my son, from way back. It has probably sat in there for years. I phoned him today to see if he wanted any of it and the answer was to get rid of it all. I should have done it ages ago. But it does feel good to have some extra space, albeit not a lot.  The bed is still covered with things that I'm not sure what to do with, but that will no doubt disappear soon hopefully.
Here are a couple of cards I made today, between tidying up.
Both have Stampin Up images and the same American Crafts Elements ribbon and the first one also uses a Cuttlebug leaf die.
Everybody Art - Autumn
Both could be considered for the theme of Coffee and Cream at  Paperplay Challenges,  and the second one also uses the sketch from Eat, Sleep Stamp.
Charisma Cardz - Anything Goes
A Spoonful of Sugar - Anything Goes
Allsorts - Plain & Simple
Crafty Creations - Falling leaves
Everybody Art - Autumn

Clean and Simple... I love it!
Caardvarks - Clean & Simple

Get Sketchy!

It seems to be taking me a while to get into the swing of getting a few challenges done. A few days away and it seems as though I'm all at sixes and sevens.
Anyway, here is a card for the Get Sketchy Challenge. I'm not sure if I've entered one of their challenges before, but I liked this sketch and so I had a go.
It's very simple. A Cuttlebug embossed panel with Cuttlebug flowers randomly scattered on it with a Stampin' Up sentiment on the ribbon panel.
Stamp Something - Fall Colours

Thanks so much

We are just home from a few days 'Gourmet' break in Jersey. What a wonderful time we had! This was our second visit to the island and we enjoyed it just as much as previously. The five and seven course meals took a bit of time to get through mind... but we managed stoically!
Now back to crafting...and dieting probably!
At Simplicity this week, the theme for One Layer Wednesday is 'Nature'. How wonderful is that?
For this card, I used a plain rectangle stamp in Mellow Moss (SU) and stamped the Personal Impressions butterflies and the SU sentiment with Stazon Olive Green.
Clean & Simple!

Friday 24 September 2010

Photo Inspiration - Guest Designer No Time to Stamp

For my second week as Guest Designer at No Time to Stamp we have this wonderful photograph of an Asian Bride ready for her wedding for the challenge inspiration. Isn't it a stunning picture!
Firstly I chose colours from a similar palette and decorated the blue panel with a paisley embossing folder which I had inked with gold ink and used it on the debossed side.
The main motif is a triple embossed square using gold and copper embossing powder and stamped with a lovely stamp from Stampin' Up. The brown paper is embossed with a Papermania folder and highlighted with a little gold ink. The turquoise ribbon is just a little wider than the brown, so that just a touch shows from beneath it.
I made the sentiment on the computer, which I mounted on Nesties and finished the card off with some brown adhesive gems and a couple of Quickutz swirly things.
It was a project which I really enjoyed making.
The team at No Time to Stamp make the most amazing creations, so do visit their blogs and check out their fabulous work, you'll be truly inspired. They'd love to see what you can create.
Sharon Johnson:  No Time to Stamp

Barbara Anders: Paper Pursuits
Jenny Gropp: One Krafty Kat
Janine Orchard: 2bKrafty
Deb Saaranen: Dream In Color

Wednesday 22 September 2010

What's cookin'?

This little sweetie is Leo the Lion from Digital Delights, who are the sponsors of this week's challenge at Cooking it up with Katie. The recipe this time around is for Something sweet, Ribbon and Metal.
The flowers and bees were a little gift from my daughter-in-law when I was browsing a craft shop in Bury St Edmunds where she lives and I have been waiting for an opportunity to use them. The lion seems to be looking at the bees in puzzlement.
The paper is from Cuddly Buddly and the corners are made from a Cuttlebug Vintage square cut and half diagonally. I always put double sided tape on the back of the card before putting through the 'bug so that all I have to do once it's cut is to peel and stick.
The sentiment is from Stampin' Up.
Do join in with the challenge, it can be such fun combining the elements for the challenge and you are welcome to combine your card with other challenges.

Tuesday 21 September 2010

Kids at Play - My drawing

This is another of the images that I had a try out at drawing some time ago. I had thought that maybe I could come up with a range of digi images, but it took me so long to get an image that I was satisfied with, that I kind of gave up. I also had a go at trying to use a computer drawing package, but the technology got the better of me. I'm the sort of person who needs to be shown how to do something rather than reading what I should do. Maybe sometime in the future I may have another go.
This card is my DT card for My Time to Craft this week, where the challenge is Kids at Play.
This little girl is based on my granddaughter Daisy, and she loves to play with balloons. I saw her at the weekend and she is such a cutie!
The paper is from Fred She Said and the sentiment is Stampin' Up. The corner is Cuttlebug and the image is mounted on Nesties.

Monday 20 September 2010

Playing around with digi hybrids

I bought a Hero Arts Download that is going to take a bit of getting my head around if I want to exploit it fully, but for now I printed off the butterfly in Word, then I over-stamped it with a script stamp and and added the colour with distress ink. Finally I stamped it with Versamark and put some clear embossing powder over it and heated it to give it some shine.
The background is a Hero Arts Stamp (I think) which I stamped in Versamark and embossed over a script stamp with clear embossing powder. I then sponged distress ink in Weathered Wood over the top and buffed it with a paper towel.
I think it's quite an interesting effect.
I did it - Keep it Simple
Cinema Saturday - Use Metal
Alphabet Challenge U- Unused stash (Flower background stamp)
Sew Many Challenges - Wet or dry Embossing

Saturday 18 September 2010

DL Stepper card Tutorial

These instructions are to make a Stepper card from a DL card base. ie 20cms x 10cms

  • Firstly decide how large a section you would like for the tall section of the card I usually like to have about a third of the total width, so 6 or 7cms is fine. On the inside of the card, draw a pencil line from top to bottom,  drawing across the fold, 6 or 7 cms from the edge of the card.
  • Next, placing the card with the pencil line horizontally nearest to you, score down from the top edge of the card to the pencil line at 2cms., 4cms., 7cms., 10cms., and 15cms. from the left or right hand edge, it doesn't matter which. It depends which side you want your tall section.
  • Using a trimmer or a craft knife and steel edged ruler, cut down the pencil line between the first and the last scoremarks.
  • Lastly, making mountain and valley folds, crease along the score lines to form the steps.
You don't necessarily  need a score board, you can score with a ruler and embossing tool or a Woodware Scorer, or however you do your scoring.
The base card is then ready for decoration in whatever style you fancy.
I hope this was a help.
For folks west of the Pond here are some imperial measurements for making this card in approximately the same dimensions.
Card stock 8ins x 8ins folded in half.
Scoring  at 3/4in: 1 and 1/2 ins: 2 and 3/4ins : 4 ins:  and 6 ins:

Spotlighting Technique

I have just returned from Staples after changing my craft chair for a second time.
I bought the original chair about a year ago and was quite pleased with it until the leather/leatherette split around the stitching on one of the arms. We had taken out cover to insure against mishap and the chair was replaced with absolutely NO quibble.
A similar thing happened to the replacement chair and so back I went to Staples. They couldn't have been more helpful. I have changed it for a different model this time, which is in fact much more comfortable and so I am well pleased.
I also bought a Really Useful Box to keep some of my clear stamps in at the same time.
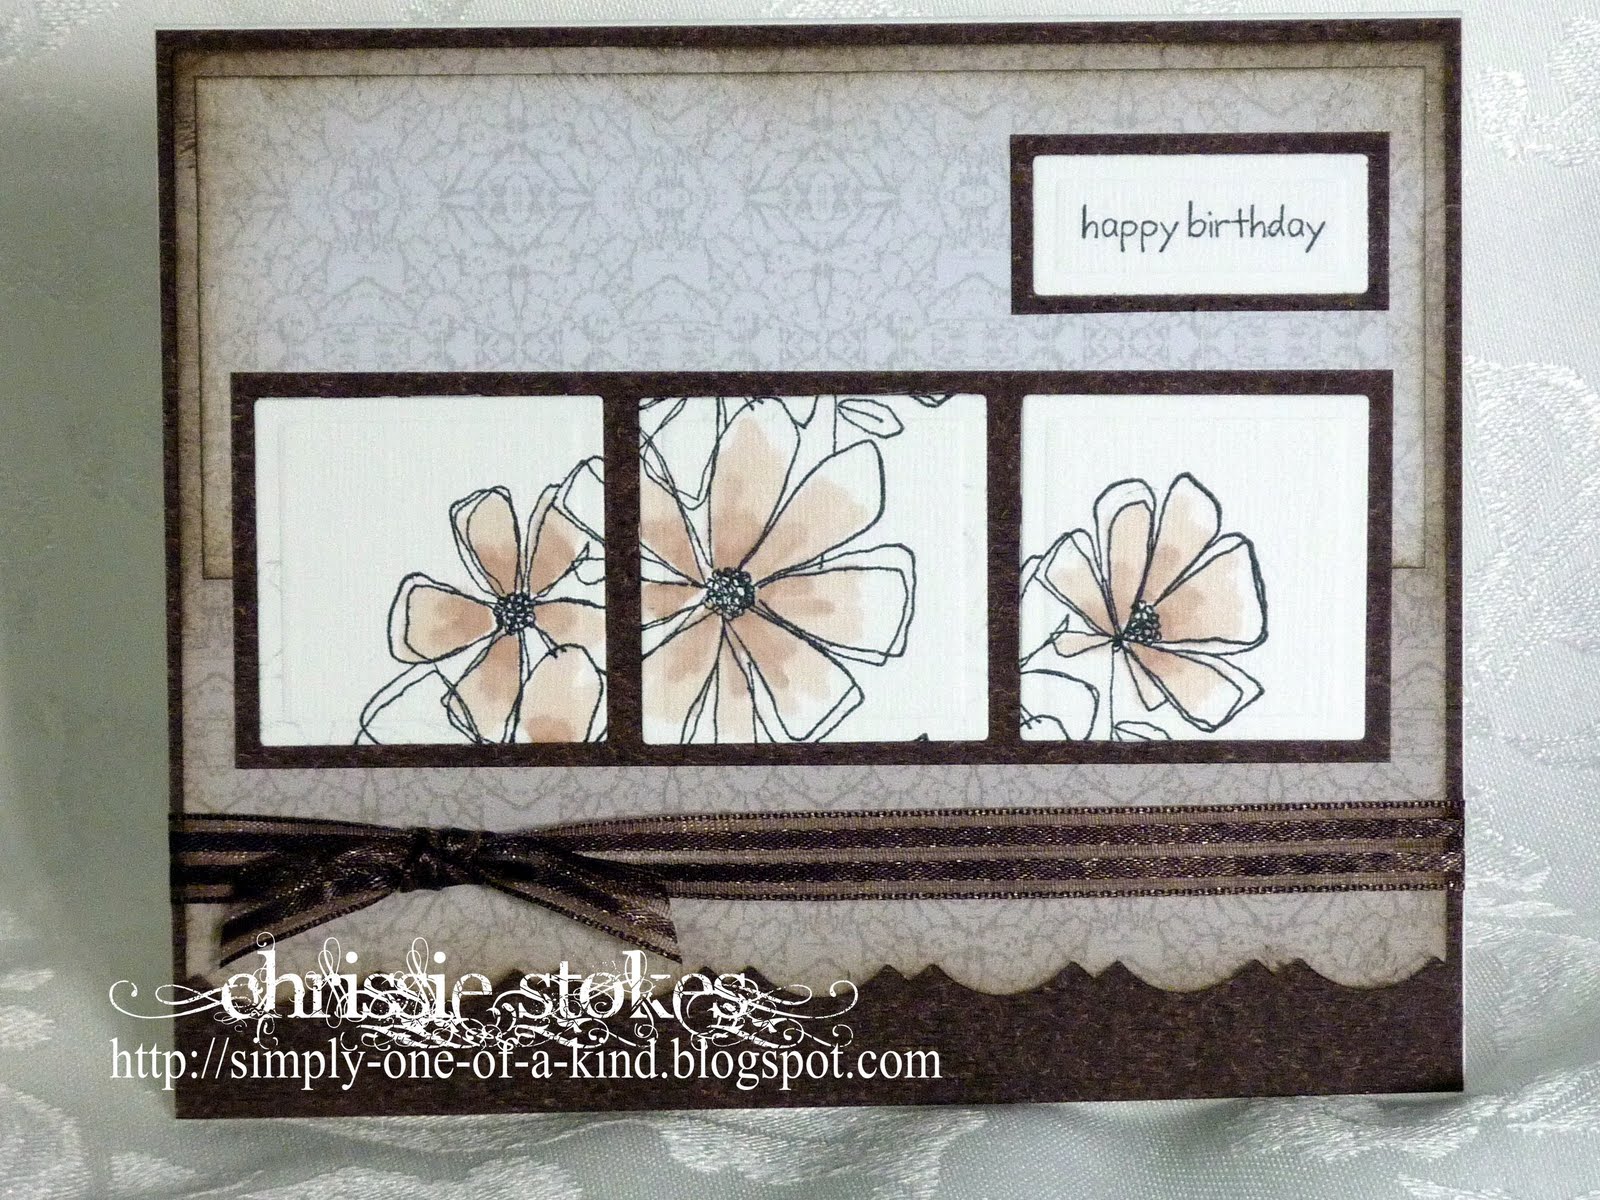
So... on to this card. It is for the sketch at Our Creative Corner, which I thought, lent itself to this technique. It's called Spotlighting, for fairly obvious reasons. It's quite an  interesting idea isn't it!
The image is a freebie from Digi Doodles and I think it's wonderful. Their challenge is Anything Goes!
The sentiment is from Stampin' Up and I sadly can't remember the make of the digi paper. I wish all makers would add an identifying name to their images and papers, it would make things a little simpler. The very bottom layer is a lovely woodgrain paper which I got in the Paper Mill Shop.
Secret Crafter - Anything Goes
Stamp Something - Use something digital
The Shabby Tea Room - Inspired by nature and/or green
Oooh,I do like my new chair!

Stepper Card

I decided to make a stepper card of slightly different dimension from those which I have made previously. With this, of course comes the problem of working out the measurements.
I cut a piece of card to DL size and discovered that it was 20 cms from one side to the other measuring across the fold. This made the sizes of the steps really easy to calculate.
I scored on the 2cms, 4cms, 7cms, 10cms and 15cms. Perfect!
If anyone would like a tutorial on how I did it, I'll see what I can do. 
I used my Stampin' Around wheel to make the houses for the village and added the lorry and the flowers from the Loads of Love set, also by Stampin' Up.
Coloured with neutral shades of Promarkers, I rather like the effect.
PaperPlay- All shapes and sizes
Paper Romance - Birthday or Christmas
Simon Says Stamp - Move it
Everybody Art - Shaped Cards
Cards for Men - Masculine , Transport.
Stamp Scrap & Doodle - Birthday Card


OSCC Sketch challenge + Autumn

The DT at One Stop Card Crafts was fortunate enough to work with some gorgeous images from Robyn's Fetish, who is our Sponsor this week, for the sketch challenge which our teamie Val has produced, adding that we should use autumn colours. (Phew, what a long sentence!)
I coloured this jolly looking pumpkin with my Copics and mounted him using Fred She Said papers. The leaves are from a Papermania Punch and the sentiment is from Unity Stamps. The team have come up with some amazing cards, so do hop over and take a look, so that you too can join in the fun.We'd love to see what you all come up with.
I had to go to the dentist this morning for a check-up and a little remedial work to one of my teeth. The dentist had thought that the problem was going to be worse than it turned out to be, so both of us were relieved.
Tomorrow our daughter and son-in-law are treating us to lunch in a swish restaurant in Lyme Regis for our respective birthday presents. I'm really looking forward to it. I'll let you know what it was like when we get back!
Delightful Challenges - Pumpkins
Stempel-Magie - Autumn Colours
Incy Wincy - Autumn Colours

Friday 17 September 2010

Sweet Sketch Sunday

I have just spent quite a while trying to work out how to add a feed to my blog.It's like the blind leading the blind I'm afraid, I really am rather clueless about these things. I have done something... I don't know if it's right.  I miss having the kids here to sort out my technology. 
I have been playing around with a Letterpress kit which I had to go and fetch from the Post Office this afternoon, as they tried to deliver it during the three minutes this morning when I was in the shower! I think that it and me will probably come to blows. I got it slightly out of line when I tried to run it through my Cuttlebug and it was really hard to do and I saw afterwards that I had scrunched one side of the bottom plate somewhat.  The ink takes ages to dry and I've got it everywhere. Hey Ho! Maybe things will get better.
Anyway on to this card. It's the sketch from Sweet Sketch Sunday and I had a play with a large Penny Black Stamp called Gossamer. I stamped it three times and die cut three different sections from it and then arranged the pieces in a line after adding just a hint of colour.
The papers are from Bits of Ivory, the sentiment is Stampin' Up and the  ribbon was coloured with Copics.
I love the sketch I'm not quite sure if I've done it justice however.

Cracked Glass - Guest Designer No Time to Stamp

I was delighted to have been asked by Sharon, at No Time to Stamp, to be a Guest Designer for two weeks. It is enormously flattering to be invited to a position such as this and of course I was delighted to accept.

The challenge this week is entitled Cracked Glass and is a technique that I have only tried about once before. I really could have done with some UTEE, but unfortunately had to cope with fine detail embossing powder and so had to do extra layers.

It's a fairly straightforward process.

  1. Stamp and colour your image
  2. Ink all over with Versamark ink and sprinkle liberally with Clear Embossing powder, shaking off the excess (UTEE is best)
  3. Heat with a heat gun until all the powder has melted
  4. Repeat steps 2 & 3 several more times (2 or 3 more times) until there is a fairly thick layer over the image
  5. Put the card into the freezer for about 20 minutes
  6. Take out and bend the stiff card to crack the glaze
  7. The cracks can be left as they are or distressed with ink or chalk
Once more I can't remember the source of this image. If I come across this information I'll amend the post.

It's coloured with Copics and embellished with Quickcutz flourishes. I made the sentiment on the computer.

The backing paper is a free download from the Canon Scrapbook site and I coloured the ribbon with one of the Copic pens which I used for the flowers, as I didn't have an appropriate colour in my stash.

It all looks rather serene doesn't it!

Do look to the Design Team for their inspirational cards, you can find them through the following links, and Sharon's through the link above. We'd love to see your creations, so go and have some fun!

Deb Neerman: Paper, Ink, Scissors & Stamps

Barbara Anders: Paper Pursuits

Jenny Gropp: One Krafty Kat

Janine Orchard: 2bKrafty

AJ Otto: The Willow Garden

Deb Saaranen: Dream In Color

Barb Schram: Explore. Dream. Discover

Sadly, Barb is feeling unwell this week and so is sitting out this challenge.

Something Yummy - Guest Designer at Raise the Bar

I think it's really yummy that I have been asked to have a Guest Spot (Guest Bar-Tender) on Raise the Bar Challenge Blog. The theme, strangely enough is 'Something Yummy' and I chose this gorgeous image of strawberries as my source of yumminess. I ought to label where I acquire my digi images, as I've bought so many and downloaded so many freebies that I find it difficult to remember where they all come from.
It's coloured with Copics and the strawberries were then glazed with 3D Gloss Finish. When it was just tacky, I poked the spots where the seeds are with an embossing tool, which left little dents in the surface and made it look a little more life-like. The central panel is edged with a little broderie anglais, which has been knocking around in my sewing box since my 29 year old daughter was about 2 years old. I can remember edging some of her dresses with it. The flourishes are from a Quickutz die and the sentiment was computer generated.
I'm quite pleased with this one. It's for my friends birthday in a few days. We met when we lived in the States in the 70's and have been friends ever since. She is Godmother to my son and for several years our only contact was Christmas and birthday cards. However, a couple of years ago we met at the Rose Bowl, Hampshire's cricket ground and have continued to meet very frequently since that time.
I hope she likes it!
Alphabet Challenge - U - Unused stash (I think 27 year old broderie anglais counts)

Thursday 16 September 2010

A bunch of challenges

I thought that I would have a bit of experiment to see if I could combine a few challenges.
I began with the Crafty Cardmakers challenge to use alcohol inks and made the background for the flourishes from Keep it Simple. I then distressed the edges for ABC's distressing challenge and as the sentiment has a bee in it, that qualified it for Cute Card Thursday's Tweet & Flutter Challenge.
The flourish is from Artemio and the sentiment from Inkadinkado.
I quite like the effect of using scrunched up and then flattened cling film over the inks, which leaves the crackled finish. The ribbon was coloured to match the base paper using a Copic pen.
Job done.
Crafty Catz - Chocolate & Green

Thanks so much

I have had such trouble this week trying to fulfil the One Layer Wednesday Challenge at Simplicity. It is to use 3 images and 1 sentiment. Sounds easy, I hear you say, but I found it really tricky until I came across this stamp which was a freebie with Craft Stamper some months ago. I have not used it before, but I find the image quite compelling now that I have seen it stamped. I used the Stampin' Up guide for the Stampin' Around wheels to get the images in line accurately.
I used Stazon ink in Timber brown and added a sentiment from Stampin' Up.
Your Next Stamp - Give Thanks
Stamp Insanity - One Layer Wonder

I love shoes

I've had this Hobby Art shoe stamp for a very long time, but not used it much. The challenge at Paper Playtime prompted me to dig it out and have a play with it. The Title of the challenge is similar to the sentiment I made on the computer for the card, 'If the shoe fits, buy some in every colour' so I stamped one for each colour of the rainbow, plus black.
There is a picture inspiration at Kaboodle Doodles this week, of a beautiful patchwork quilt, so the design of this card is taken from that.
I seem to have done a lot of not much this morning...maybe it's just one of those days!

Nestabilities Tip

Have you ever wanted to cut out a sentiment or image but didn't have a die of quite the right dimensions?
Well, I alter die-cuts from time to time and this card was a case in point. The word 'friendship' was too long and thin for any of my dies, so this is how I made a die cut to fit.
  • I printed the sentiment onto a piece of card
  • Then I placed a Nestie rectangle over the word so that the top border was the size I wanted. I put a piece of scrap card under the part of the die which extended beyond the bottom of the sentiment card, to prevent it from digging into the cutting plate.
  • I then moved the piece I had already cut out further up in the die so that the lower border matched the one at the top. Once more I did the cutting over scrap card to prevent the die embedding itself in the cutting plate.
  • Here is the finished die cut, which looks as though it has been cut in one operation.
  • Should you have no die suitable for your image or sentiment, you can always cut it out with your trimmer and then using a Nestie and an embossing tool, simply use it as a stencil and emboss the edges a little at a time, moving the card around to fit into each corner in turn.
I hope this might be of interest to some of you!
These images are from a Stampin' Up Set and the sentiment from a Hero Arts boxed set.
Stamp Insanity - It happens in threes

Wednesday 15 September 2010

WOYWW

I'm feeling rather smug this week, as I've had 2 invitations to be a Guest Designer, one from Raise the Bar and the other from No Time to Stamp.
I find it enormously flattering to be chosen rather than having to apply in the usual way. SO watch out tomorrow and Friday for the first of these guest spots. There are the remains of some of the projects I've been getting ready on my desk... but of course you can't see them...yet!
One card is slightly different dimensions from the norm and so I can make the envelope for it with my Enveloper Pro. I used to make all my own envelopes at one time but now I tend to buy stock sizes. The board comes with instructions for lots of different sizes, but I've worked out a few extras for myself.
Here are a few more cards on the pile which need envelopes making for them.
I find it quite a relaxing occupation, but it palls slightly if I have to make too many!
Have a great Wednesday, and do join in with the global snoop of workdesks via our leader Julia (link on my sidebar).

Tuesday 14 September 2010

Anyone for Pizza?

The sponsor this week at the Creative Card Crew is Sassy Cheryl and the crew were fortunate in having some digis to work with. I decided on a stepper card for this cute little lady spinning round the pizza dough. I thought of her the other day when my husband made pizza dough for the first time in our new breadmaker. The amount was slightly less than the recipe from our previous model and I was trying to do this, very badly, I might add, in order to stretch the dough enough to cover the base of the pan.
It's odd, I always associate pizza with autumn, I think it may have something to do with the colours. I always add pepperoni, so there's the brown, plus peppers, which are all in autumnal shades... green, yellow, orange and red. The last one I made also had a liberal sprinkling of anchovies too... mmmmm yummy!
This maybe the reason I chose this image for the challenge, which has the theme of autumn. The paper is from Cuddly Buddly and the sentiment was computer generated.
I'm off to take my husband to the hospital for an outpatient appointment this morning, I'd better get my skates on.
Our Creative Corner - Fun with Folds
Raise the Bar - Orange, Brown & Green

Monday 13 September 2010

Cute Teddy

Just look at this cutie from Bugaboo stamps... you could have him too, he's a Freebie... thanks so much Bugaboo.
This card is for their Catch the Bug Challenge, A stitch in Time. The little bear is sitting on a spool of thread and I have added faux stitching around the edge of the backing paper, which I printed with my Rollagraph Tiny Leaves wheel. The blocks of Autumn colours are from Basic Grey and the sentiment was generated on the computer.
I wasn't sure whether the little bear is wearing a nappy or whether he just has a fat tummy with a heart on it! As you can see I went for the nappy option!
Taylored Expressions - Sketch (I like this one, I think I'll be using it again!)
Cute Card Thursday - Play on Words
CCEE Stampers - Teddy Bears
Pollycraft - Autumn Colours

Playing with ink

There seem to be a few opinions on exactly what a One Layer Card is. I have always understood it to be a single sheet of card, folded in half. .. in fact no other layers. I did think that the odd embellishment was allowed as that would not consist of an actual layer. I don't know where one would look for a definition, but this is my interpretation.
I masked all but the middle square of the card and inked the exposed part in a variety of colours, ending with a marbling roller stamp from Rollagraph in gold pigment ink. I then overprinted this with the Penny Black Falling Stars stamp in Stazon and finally added the Penny Black sentiment.
I really like unfussy cards.
Winter Wonderland - One Layer Card

New Technique

This technique may be familiar to lots of you, but for me it was the first time of trying Stamp 'n' Bond with Gilding Flakes.
I stamped the Penny Black image with Versamark and added the Stamp 'n' Bond before heating and melting the powder. I then pressed the flakes over image and brushed away the excess. It goes everywhere if you're not careful, but I quite enjoyed it. I think the effect is lovely. Probably I won't be so scared of doing it again. The bits and bobs have been sitting in my drawers for quite some time.
I heat embossed the Hobby Arts sentiment with regular gold embossing powder, I wasn't sure that it would be legible enough using the flakes.
I edged it once more with my gorgeous Fiskars Upper Crest border punch.
Penny Black - Card for a man or boy
Christmas Card Challenge - Christmas Trees
Aly's Sunday Challenge - Sparkly & Glittery
Alphabet Challenge - T... Trees
Penny Black at Allsorts - Punches (September Challenge)

Autumn

I bought a set of Hero Arts Sentiments ages ago and somehow the right card hadn't presented itself to use any of them... until now.
This one seems just right for this clean & simple card, using Basic Grey, Indian Summer papers and stamp. It seems the more I make this type of card, the more I think that the style is 'me'. They give me the most satisfaction anyway.
I got the idea for this card from Julie over at Paper and Such... her work is inspirational!
Yesterday wasn't very productive, but today I feel that I may get somewhere, I've certainly got a lot to do, the last thing being to join my husband at the Rose Bowl for the first day of Hampshire's last home cricket match of the season. He's just left, but a whole day of a regular match is a bit much for me!
Allsorts - Autumn Colours
Mark's Finest Papers - Autumn Colours
Paperplay - Autumn
Paper Romance - Clean & Simple
Stamp Insanity - It happens in Threes
Simon Says Stamp - Thanksgiving
Anything Goes - Autumn
Tuesday Throwdown - Celebrate Fall
Crafty Cardmakers - Clean & Simple

Spots & Stripes

I've had yet another invitation to be a Guest designer (Bar Tender) next week over at Raise the Bar Challenge. The selection was made for the card I offered for their 'URL'ooking Good challenge, where the inspiration had to be taken from your own blog. I cased my blog header. Joni asked me to pop it on my sidebar as she thought it such fun. So I'll do just that!
I am so flattered to be chosen for these super little cameo appearances. Thanks so much Joni. Do take a look on Thursday!
This card uses SU stamps and Canon Scrapbook free downloaded papers. The little die-cut flowers are Cuttlebug.
Crafty Ho - Green, Blue & Yellow (only a touch of the latter)
Stamp Something - Spots & Stripes

Saturday 11 September 2010

Red, Gold and Cream

This tree image from Penny Black always reminds me of my prefect's badge from Grammar School. I think our emblem was an apple tree, but the general shape was very similar. It's lovely isn't it!
I heat embossed this one and then overprinted it with my Rollagraph script wheel stamp, in gold pigment ink.
The sketch is from Clean and Simple and the colours are from Colour Create's challenge this time around. I made a card for their last challenge but by the time I got around to uploading it, the challenge had changed!!
The embossing at the edges was made with a Papermania folder, the sentiment was computer generated and the scallops are from a Stampin' Up punch.
I ordered a Letterpress set this morning, stupidly I forgot to order extra inks, I think I'll wait until it arrives and see how I get on with what is in the kit. If anyone has tips for me when using a Letterpress set I'd be happy to hear them!
Fussy & Fancy Friday - Christmas Colours
Fairy Fun Fridays - Embossing