Tuesday 24 September 2019

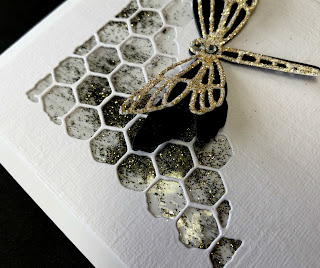
Bit of a pickle


I love seeing new ideas for card making and one superb source of inspiration is Jennifer McGuire. The other day I watched one of her videos where she used her laminator to make different backgrounds. She put little tiny bits of die cuts, embossing powder and all sorts of things through her laminating machine and some of the effects were awesome. 
I thought I would have a go!
I have been doing some knitting for my granddaughter and wanted to laminate the pattern anyway, so out came the laminator. Only half of one laminating pocket was required for the pattern and so I cut off the other piece to use with some embossing powder. BIG mistake! I think I should have not been so mean and used a new pocket as this half sheet jammed up the machine and was not visible from  either side. I think the machine must need the fold of the pocket to take it through the feed. 
I looked online to see what might be done to rectify the problem and I read that someone had taken their laminator apart in a similar instance (although probably not with embossing powder). I tried it and eventually managed to sort it out, but it was a real pickle!
However all's well that ends well and here I have managed to make a card with a laminated, twinkly embossing powder backdrop for the die cut corner.


In order to make the dragonfly tie in with this backdrop I decided to make a black base and then cut the filigree layer from white card,  to which I had added some double sided adhesive sheet on the front. Once cut, I peeled off this layer and then sprinkled on some Gold Glamour Dust.
I was quite pleased with the end result (after all the drama).
CASology Dragonfly

Saturday 21 September 2019

LIfe is just a bowl of cherries!

I had this piece of grey card left over from an aperture card I had made for a friend. SO when I saw the challenge at Just Us Girls, I decided to use it as a panel for my card. I stamped some script and some blotches on it in a slightly darker shade of grey and then die cut a few stems to superimpose over it. The green card was coloured by daubing some Cracked Pistachio ink over white card and stamping a few splotches in silver. The white piece was just distressed at the edges with Hickory Smoke ink. I added a few pearls and a simple sentiment.

I coloured this Penny Black image, cut it out and mounted it on my cards base, where I had computer generated the sentiment. I looked at it for quite some time before I noticed that I had missed the word 'a' from the sentiment. So it was taken apart and and a new base printed!!! I think these words come from a song but I don't exactly remember who sang it... I think it may have been Doris Day!

 Just Add Ink Just Add food.

Wednesday 18 September 2019

Just a note


This stamp and die set from Altenew is a recent acquisition. I saw some of the stamps on cards on various blogs and was immediately drawn to it. I don't think I've done enough colouring recently and it's something I really enjoy. I have bought many alcohol marker sets over the years and now lots are at the stage of drying up and it's  hard to decide what to do about replacement. I have sets of Mirage Pens, Copics, Promarkers, Spectrum Noir, Chamaeleon, some Stampin Up Markers and some old Dovecraft ones. I think I need to go through all of them and throw out the ones which have dried up and that I don't think I need. I do have some refills for some favourite Copic shades, but it's tricky to know what to do. I think my two favourites are Promarkers and Copics.
For this card I used Copics. I used the sketch from CASe this Sketch

Flowers for the Flower Challenge

A Dragonfly for CASology

AAA Cards Up to One Third

Sunday 15 September 2019

Sunday Morning

 
Today we have been invited over to a neighbours for something to eat at lunch time and so without Sunday lunch to prepare I have a little time in my craft room.
This card is based on the challenge at TIMEOUT
         
I love the bold pop of green in the picture and I used a piece of photographic paper which I had sploshed some shades of green alcohol inks onto, for the die cut leaves in my card.  The stripes were from a SU stamp, which I was considering taking off the block in order to get a clean image using my MISTI, but the second stamping, peculiarly, was really pale until I realised I had used Versamark instead of Versafine  (made a mess of the ink pad  too with the black ink from the previous stamping). SO I decided to sprinkle on some black embossing powder and use that instead.
The Hello is triple stacked from a Stamp Market die.
Just US Girls Stacking die Cuts


This is another card using the freebie Crafter's Companion stamps and die, from Simply Cards and Papercrafts Magazine.
Once more I cut the sentiment from the wreath to use separately. The only thing I added was a Memory Box die cut of hanging mittens, but I put the stamped and heat embossed mittens from the freebie set on the string instead of the die cut ones.
Christmas Kickstart Scandinavian Holiday


Here is a simple card using a leaf which I die cut and coloured sometime ago. I used distress inks and a little mica spray.
I heat embossed the Clearly Besotted sentiment and added both it and the leaf to a piece of hessian.


Saturday 14 September 2019

Perfectly CAS


Exciting News!
There's a new blog on the block and it's Perfectly CAS!
Just up my street!
This one has been has been created down under in Australia by the inimitable Kylie!
In order to keep things Perfectly CAS, there is the codicil ...Just One Third!
SO if you keep your design to just one third of the card base there is bound to be lots of lovely white space... the essential ingredient for Clean and Simple cards.

The first challenge is to include flowers.
Here I used a die set from Elizabeth Craft Designs, cut from white card with the centres coloured with alcohol markers. The sentiment is from Simon Says Stamp.
DO come and join in the fun!
See you there!

Christmas is coming


I've had this Christmas pudding stamp for a very long and haven't used it in fact for a number of years. I was quite surprised that its condition seems to have deteriorated to the extent that the rubber has hardened and wouldn't stamp cleanly. Even with Versafine ink, which normally will make a good impression from any stamp, it wasn't working, so I had to resort to putting the wooden stamp in the microwave for a short while to loosen the glue so that I could take the stamp off the block to try in my Misti. After several stampings I got a reasonable impression. It's strange but once I get an idea into my head I need to carry it through... another stamp wouldn't do, I wanted to use this one!
Anyway, once stamped I coloured it with Copics and then twinkled the icing part with Glamour Dust and  covered the rest with NUVO Crystal Glaze.
The sentiment is from Creative Dies.
CAS Christmas Holiday Treats 
CAS on Friday Use Die cut words

This card would fit into CAS in Friday's challenge too, but I don't know how to add two cards from the same post to the same challenge.
I got the elements for this card as freebies from a magazine.
The Merry Christmas was in fact part of the wreath die, but I cut it apart before triple embossing in Gold. I managed to find a circle die which was just the same diameter as the wreath so that I could make an aperture and attach the wreath to the edge. I used two of the little bird stamps to make the revolving part, fixed onto a piece of gold thread.
Christmas Kickstart - Scandinavian Christmas
I may make another for this challenge as there are loads of super Scandi stamps in the give away.

Lots of dies

I love this colour combination. It's a mix of inks, card and scrap paper.
I sploshed a little Distress Ink in Pumice stone and Festive berries onto a piece of card before spritzing with water  then die cutting the flowers (by Alexandra Renke) when dry. For the squares, I simply daubed a little Pumice Stone ink randomly onto the card before die cutting.
To compose the card I began by stamping some grunge dots before layering the die cuts over each other and adding a little fine twine bow. The sentiment from Avery Elle was stamped onto a piece of scrap paper/card from the middle of a roll of wrapping paper and embossed in white.
 
The Flower Challenge - Anything Goes


I remember from my teaching days the wonderful stories by Barbara Firth  and also by David Bedford about a Big Bear and Little Bear and this stamp set from mama Elephant makes me think of those stories. 
They each love the other to the Moon and Back!
I layered the die cuts and because the bear has a grey outline (Memento London Fog), I decided to add a grey base layer to the stacked word die cuts and offset it slightly so it can just be seen.
Both parts were liberally sprinkled with Glamour Dust. I started off with the bears stamped directly onto the card, but it looked rather out of place against the dimension of the sentiment, so I stamped another and added it on dimensional pads over the first image.
Die Cut Words

Friday 13 September 2019

A couple of cards

Here is another card for the challenge at CAS Stencil which is to use Baby Wipes.
I made a stencil in  vellum from a Sizzix die. After daubing some Pumice Stone Distress Ink onto  a piece of  card, I laid the stencil over it and removed some of the colour with a Baby Wipe. I cut a couple of leaf sprigs, one from some packaging (in fact I think it was the rolled centre of some wrapping paper) and the other from some white card which coloured slightly here and there with some more Pumice Stone ink.
The sentiment is from Clearly Besotted and a few tiny pearls finished the card.


This next card is for a few challenges

I took the sketch from CAS(E) this Sketch


The Theme from Inspire Create
and the word prompt from Inskirational

I cropped the corners of this card with my We R Memory Keepers 3/8 corner rounder. It matched the contours of my Framelit die cut (which I used for the embossed piece) perfectly.  I actually used a rectangle die but shortened it to make a square. 

I used Paper Mill Direct pearlised card for the base and backdrop of this card. It's a really pale blueish colour. I've had it for ages... waiting for the opportunity to use it! I have so much hoarded away since before their retail outlets closed. The foliage stamp is from Altenew and the sentiment from Avery Elle. I dry embossed the background with a Sizzix/SU embossing folder.
Both of these cards are similar in sentiment and i think that both have  tranquil feel.

Monday 9 September 2019

Feel better

A short time ago I saw a card using these fabulous fish on the internet and just loved them, so I just had to get them from Rubbernecker. The die which complements them fits amazingly and I am delighted with my purchase.
This card uses the baby wipe and stencil technique as requested at the CAS Stencil challenge. I made a stencil in vellum from a Sizzix die and used it over a daubed Distress Ink backdrop, removing a little colour with a baby wipe. I wasn't too keen on the transition at the top of the inking and so decided to use this La La Land  die to effect the join.
I simply added a little seaweed from a Sizzix die, and a sentiment from Sugar Peas Designs.

Saturday 7 September 2019

New Technique (to me)


The girls over at the CAS Watercolour, Mix Up and Stencil challenges are constantly introducing me to either new techniques or ones I need to revisit. Here is a new one to me... using Distress Inks with a stencil and baby wipes!
To begin, I daubed some Wild Honey Distress ink onto the card, before covering it with a stencil I had made from a Sizzix corner die and some vellum. Holding it still, I gently removed some of the colour through the stencil, using a baby wipe. I think the effect is terrific. I stamped a few blotches over this in the same DI which of course appears a much stronger shade.
The little bees I think are from Memory Box dies... I've had them absolutely ages and never used them... after trying to assemble these I can understand why... there were very fiddly!
I cut them from white card, coloured the components with different alcohol pens and then stuck them together before clear embossing a few times.
The sentiment, stamped in deep deep brown ink, I think may have been a freebie
CAS Stencil - Baby Wipes

Thursday 5 September 2019

Just one inch

I was determined to make an inchie which pleased me...  and this one does.
I began by cutting a few squares, then dropping a little Festive Berries Distress Ink onto one before spritzing with water. 
The next stage was to smear a little  Old Silver Inka Gold onto part of it and spritzing again. When dry, the next thing was to stamp a tiny script stamp from SU(French Foliage) over it. I die cut a couple of  holly leaves in green paper and added them before triple embossing... or maybe it was quadruple embossing (as I didn't use UTEE) with fine clear embossing powder. Whilst still molten, I stamped the circular stamp with Brilliance Gold ink into the corner. When cool I added the couple of pearls for berries.
I love that the card is so big, yet the image so small it really draws the eye as there's nothing else to look at!
I think this works for both  Challenges CAS Mix Up and CAS Watercolour
          
Now for a trip to the park with my littlest grandchild!

Wednesday 4 September 2019

Little Elf


Sometime ago I entered a challenge to make a Christmas card with an elf! I knew I had an image somewhere... just one... and eventually found it. However when looking for something else a short time afterwards I came across this little chap... in fact he has two brothers (from Hero Arts) plus a die to accompany him. I had no recollection of purchasing them, but was pleased to find them in my stash. So here he's coloured with Copics and mounted on dimensional pads.
We used to have a pop up elf, you pressed a button and one of those criss cross extending mechanisms made him shoot up and a voice said "Have you been good?" in a very American accent. It made me smile every time and once the decorations came out each year I would put it in the downstairs loo, so that any visitors could have  a chuckle too! Hence the sentiment I added here which I did on the computer as I didn't have a stamp!
He is kinda cute isn't he!
It's my DT card for Happy Little Stampers Christmas Challenge
You could of course do an Anything Goes card... but if you have an elf we'd love to see him/her!

Complementary colours and Inchies

Last night I received orders for 5 cards, so today I shall be busy with my thinking cap on for what to do! I have been making cards for this one lady in Ireland for some years, ever since she received one of my cards from a friend, but before I begin on that little lot, here is a card for the challenge at CAS Watercolour.


I guess I chose an easy option with red and green!
I used a die from Alexandra Renke, which I cut from white card and then spritzed with water before adding Distress Inks and watching the reaction as it moved through the water. I decided not to put the die cut pieces from the petals back in this time, I'm not sure which I prefer... in or out!
The kraft circle was a left over from another project but I thought it made a good backdrop for the flowers. I hope it is permitted to have this extra colour!
The sentiment is from Altenew.

To make the inchies on this card I began by stencilling the pink dots, then I stamped the script and added some splats in a deep pink colour. I stuck on some small Alexandra Renke die cut flowers so that they would appear off centre on each piece and then die cut  the inchies with a Sizzix die. I distressed the edges with a little gold Brilliance ink and added a tiny pearl to the centre of each flower. The border die is from Stamplorations. I have scrawled 'A little sentimental' on the carrier sheet for the sentiment stamps, but sadly not the manufacturer. I don't have space to keep my stash in its original packaging, which is squirreled away elsewhere, so from time to time I'm at a loss to identify some of it. If anyone can recognise it I would be glad to know. I have looked on the internet without success.
It's another attempt for the CAS Mix Up challenge but once more I'm not really satisfied with the overall effect so I may try one more time!