Wednesday 30 September 2020

WOYWW #591

I'm sad to say that I haven't joined in with the workdesk fun for a long, long time, but today I thought I'd try to remedy that as my desk is really tidy (for me)!
It contains the detritus from a few days' play.
I see I left the top off my take away box which contains my Lawn Fawn shammy, it has obviously dried out, so a trip along to the bathroom to refresh that is called for. Speaking of bathroom, I see a toilet roll too... that's not there for emergencies, but I was trying my hand at papercasting... there is a little square there which was my first attempt, but I have just received a package with some plasticine so I'll be trying a slightly different technique incorporating that... if I can get it right.
The upright  magnetic sheet at the back is where I throw dies that have recently been in use or ones which I use quite frequently. Sad to say some unintentionally stay there for quite a while.
If anyone wonders what anything is or is for... just ask.
Have a great day and stay safe everyone!
Oops!  I forgot to link back to the lovely Julia.... how remiss of me here it is!
Sorry Julia!


Tuesday 29 September 2020

Guest Elf at Christmas Kickstart


I was delighted to have been asked by the lovely Jo, to be a Guest Elf on the wonderful
It's such a great idea to get a supply of cards ready for Christmas throughout the year, so avoiding all that drama when posting deadlines approach and insufficient cards are ready!
The challenge this time is 

My first thought of sweeties at Christmas is Candy Canes. In the late 1970's, we lived in Northern Virginia for a period of three years. My son was newly born when we arrived and so Christmases  were extra special with a little one. Unlike the UK at that time, there were candy canes aplenty and I used them to decorate the tree (not that he was able to indulge in them that first Christmas)
There seems to be a phrase 'Candy Cane wishes and Mistletoe Kisses', so I used this image from Dustin Pike, added a tiny stamp of mistletoe, (which I think was freebie from a mag) and a tiny scrap of ribbon, tied with my bowmaker. I added a  computer generated sentiment. I just noticed that I missed the 'cane' part off the sentiment, but I think it's still OK!
The frame was die cut with a new set I just bought on Amazon from Presscut. There are 16 Stitch/Dot squares which emboss either side of the cut line, so that both panels or apertures are edged! They range in size from 1/2in to 8 ins and have coordinating plain dies of which there are 32! I think they are going to be exceptionally useful!
Why not join in the fun and get ahead with those Christmas makes!


Monday 28 September 2020

Autumn Colours

Today's card began with the sketch from CASe this Sketch

I took some hessian card from Paper Mill Direct and die cut six rectangles and stacked them into two piles, glueing the layers together. Then I embossed the leaf sprays with some Simon Says Stamp dies. I used the same dies to cut leaves from a piece of glossy photographic paper which I had sploshed with a few shades of Alcohol Ink and a little blending solution. In fact I ended up using only the smaller of the two sprays. There is a beautiful sheen to the leaves, because of using the gloss paper.

The sentiment stamp is from Clearly Besotted.


Friday 25 September 2020

Hello

It's a beautiful sunny morning, and I feel pleased with the card I came up with today!
I took the sketch from
...and decided that I would like to use some crocus dies by Alexandra Renke as the the vertical elements. I used a piece of card that I had smooshed some purple inks onto for the die cuts and daubed a little distress ink onto the stems. I rather like the random dispersal of colour achieved with the smooshing technique. It took me a few die cuts to be happy with the colouring for the sentiment, some had too much white, some not enough, but I was quite pleased with the final piece. The ones I wasn't too keen on are stacked beneath the final layer. The die is by The Stamp Market.
Not having entered into my old creation "Less is More" for ages and not often using purple as a colour choice, I thought that I would add another card to their challenge this time.
The DT is SO talented and the standard of CAS cards submitted is incredibly high... due I am sure to the superb inspiration of the designers!
Have a great day everyone!


Wednesday 23 September 2020

Exhausting!


Here is a simple one layer card which I made for the challenge at The Paper Players

It's an image from Art Impressions, simply shaded with some watercolour pencils and blended with a water brush!
The sentiment was generated on the computer. 
In order to get it positioned just where I wanted it, I popped the two parts of the sentiment into text boxes and  stamped an image of the cat onto a piece of copy paper. 
I have my Word programme set to 105%  which makes the visible image on my screen exactly the size of a piece of A4 paper. I held the stamped image in front of my screen, and moved the text boxes around until I was satisfied with their location.  It's easy to see through the copy paper with the light of the screen behind it! Once the outlines of the text boxes were removed I printed the card and then cut it to size. With the help of my Stamp Easy I stamped the cat and coloured him!


Ho Ho Ho


I haven't done much card making for challenges recently, partly due to the fact that I have been doing quite a bit of sewing and partly because I really don't get on with this new version of Blogger! I have had quite a lot of commision cards to make, but I don't often put those on my blog.


This one is my DT card for the challenge at Christmas Craft Creations, where the theme is to make a shaped card. I saw this little chap in the store on the Silhouette site when I was looking for something else and thought he was kinda cute. Once cut out he looked rather flat and so I added some shading the different parts of him, to give him a little more appeal! There was a gap at the top left of the card base which I thought was the perfect place for a 'Ho Ho Ho' so I made those and cut them with my Portrait. The joy of making sentiments using an electronic cutter, is that you can choose the font you think looks most suitable. I usually try to weld the letters together so that adhering them to the card is a much more simple process!
 Make My Monday -Christmas in September
Merry Little Christmas - Anything Goes
I hope that everyone is staying safe; these are such strange times. Take care everyone!
 

Tuesday 22 September 2020

Margaret

A dear friend of mine, (who fortunately is not a Blogger, so I'm safe to show this) will be having a special birthday very soon!
I cut out her name using my Portrait and in an effort to get the letters aligned accurately on my card, I placed the piece of card which I cut the letters from, over the panel, secured it with tape, glued each letter individually and stuck them to the panel of card through the gaps, then removed the card!
The golfer was also cut with my Silhouette. The sentiment, from Hero Arts, was positioned using my Stamp Easy from Vaessen Creative. I actually prefer this platform to my MISTI, as this one adjusts automatically to different thicknesses of stamps because of its spring action. It also allows for longer pieces of card as there is no 'well' in it, ie the base is completely flat. 
I thought I would submit it to the challenge at CAS on Friday!
NUMBER(S)
This is the third card I have made for this particular occasion, as two mutual friends also requested that I make cards for her.

Sunday 20 September 2020

Really Trying


Have you ever got into that mindset where you have an idea or a fancy for doing something new and come across innumerable difficulties in order to get there...  but you just can't give it up?
This card is the end result of one such endeavour. It began when I decided that I wanted to try to cut out a stamped image using my Silhouette Portrait.
I had to begin by stamping and scanning the image I wanted (in this case a Stampin' Up French Foliage leaf), only to find that for some reason my printer wouldn't scan to my computer. I ended up using all sorts of daft things like my phone and a QR code to get the image into my computer via Google Drive. I didn't even know there was such a thing before. Anyway it got there somehow or other. Then I had to retrieve it, to drop into my Silhouette software.  Needless to say I managed that somehow. The bit I thought was going to be tricky, actually getting the leaf traced, offset and cut was easy. So I cut five out in a line.
Next the image had to be stamped correctly onto each cut out. I decided that I wanted to use three colours of ink on each leaf so this is how I went about it.
Taking the sheet of card with the row of 5 apertures, I placed it in my stamping platform, over a sheet of plain copy paper. I put the stamp where I thought was about central to the aperture and inked with  light coloured ink.

I looked to see what the positioning was like.

As you can see, in the second picture, the stamp was not quite in the right place, so keeping the copy paper still, I moved the cut out card more centrally over the first stamped image and tried again with a slightly deeper shade of ink.
Still not quite there, so again keeping the copy paper still I moved the top card ever so slightly and tried again with yet a different shade of ink.
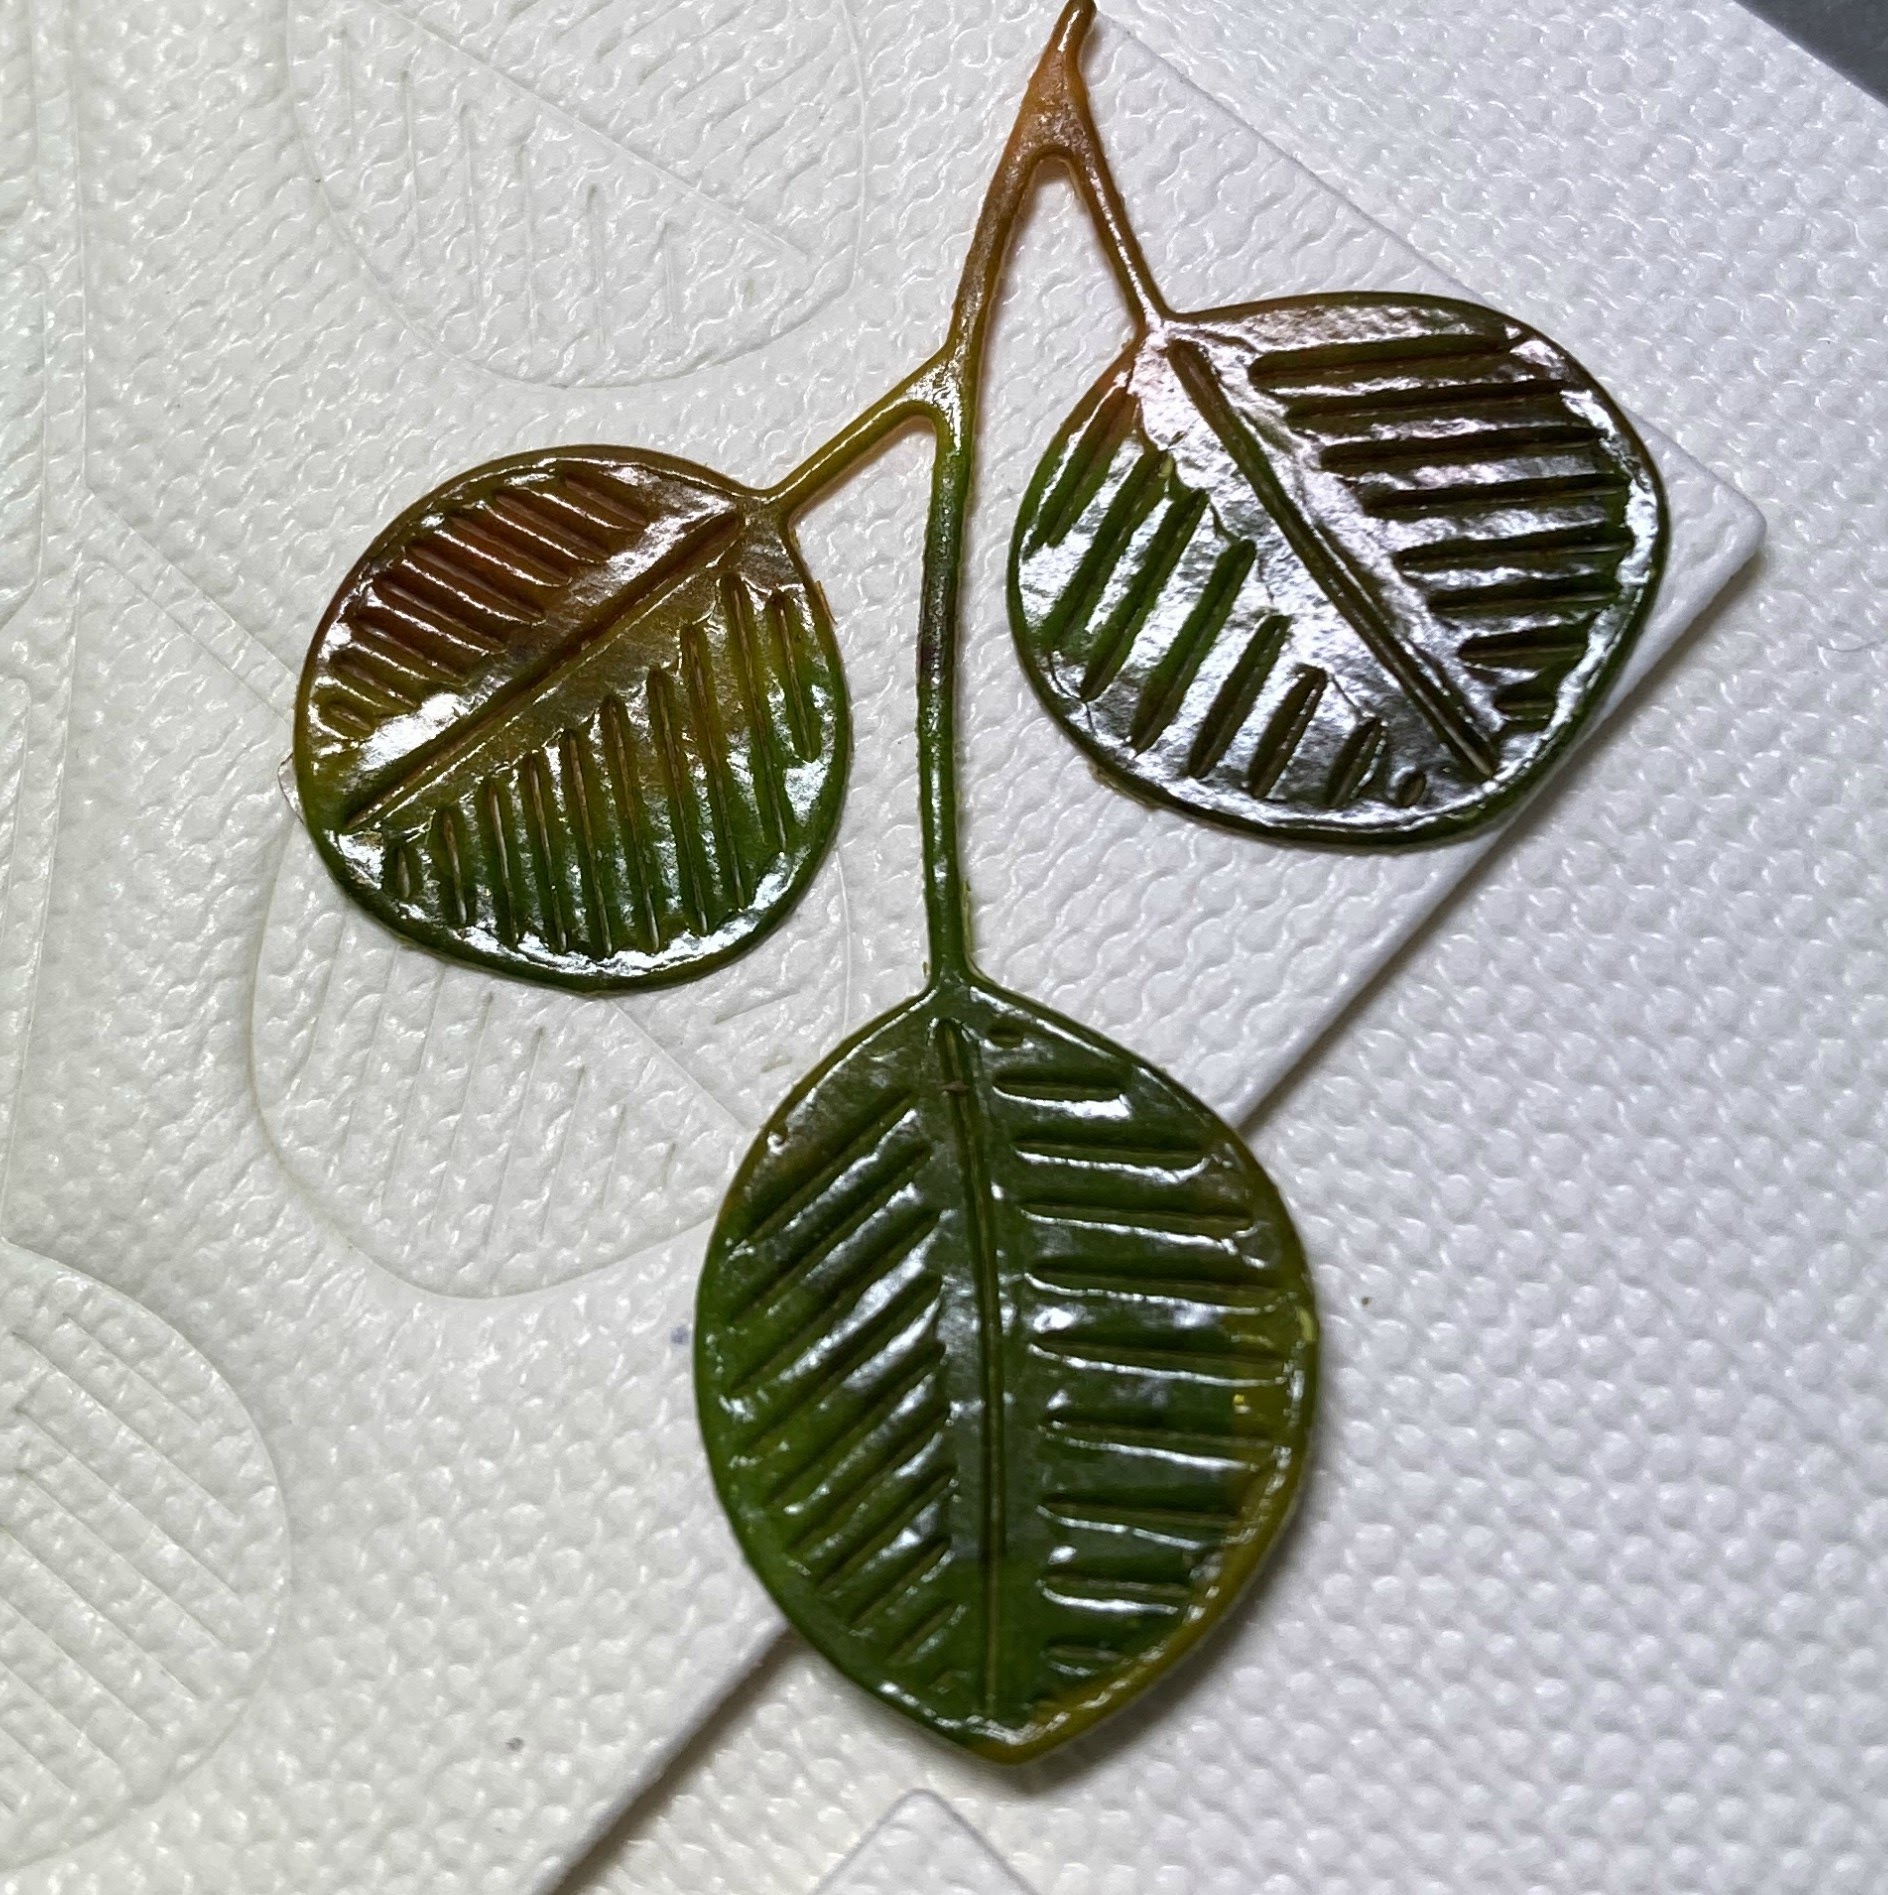
Happy with this positioning , I then proceeded to use the same aperture to insert each of the cut leaves in turn, to ink with three different autumnal shades of ink, starting with the lightest and stamping between each addition, I ended with the strongest shade.

I began by using the colours from CAS Colours and Sketches


Not having these exact colours at my disposal, I used Adirondak inks in Butterscotch, Hazelnut and Cranberry. I have to say that they look to be a really close match.
Inkspirational has the prompt word Day this time so my sentiment reflects that!


It was altogether a bit of a trying experience, especially as my computer decided to deny me permission to save the photographs of the stages of making this card, which I had just sent via email from my phone. It asked me to contact the administrator, which is me!!!! .I don't understand quite how they all arrived in the right place eventually, but I did learn a few things along the way... and this time I didn't give up!

Saturday 19 September 2020

Thanks


Here is a card made from a simple sketch from CASe This Sketch .


It was made with scraps from my 'come in  handy' drawers. I am dreadful  at throwing things away (you should see our garage... but then you probably wouldn't want to!)
The die is by Alexandra Renke and the sentiment from Simon Says Stamp. I added tiny pearls where the die had small holes, to give the impression of a little sheen.
To get the vellum to fold neatly around the front panel, so that it could be adhered on  the reverse, I dry embossed it with the die which I used to cut the panel. I could then fold it on the emboss lines and it fitted perfectly.


Tuesday 15 September 2020

Die Embossing


Here is yet another contribution to the challenge at CAS Mix UP

For this one I began with an embossing folder from Sizzix and a die by Alexandra Renke. I placed the die, cutting side uppermost, on to the open Sizzix Embossing folder, followed by  the card and then a rubber mat and finally the top plate of the sandwich.
I water-coloured the embossed leaf, stamped a few random dots and and a little script stamp , although that just looks like general distressing! A few spritzes of shimmer and then gold inked, scraped edges finished the panel. I die-cut another leaf and coloured that with Distress inks and a little smidge of gold ink. I just stamped a simple sentiment to complete the card.
I have to say it is fun learning new techniques!
Die- Cuts with optional stamped sentiment


Monday 14 September 2020

Peace Love Joy


Here is another attempt at a new (to me) technique for embossing with dies. This time I followed instructions from a video by Jennifer McGuire. After wiping both the card and the die an antistatic bag, I inked the die gently with Versamark and carefully placed it on the card over a rubber mat and ran it through my Big Shot, using the sandwich for embossing. After taking it out I heat embossed it with Gold embossing powder.
The sentiment is from a set by Hero Arts. After embossing, I cut it out with a pennant die from MFT, cutting part way from each end, to create a rectangle rather than a flag.
In order to get the tree panel to co-ordinate with the sentiment, I used the largest of the MFT pennant set of dies, which is a little longer than the the card is tall, to give matching  pierced edges to it.
This was a bit of an experiment with the technique, so next time I'll think a little more about the actual design of the card rather than just having a go at the technique.
Stamping, Die Cutting, Embossing with Dies.


I'll have to try this technique again!

Wonderful Memories


A friend asked me to make a card for her with this specific wording. Needless to say I had to make the sentiment on the computer, which in a way is a good thing, because I could choose a font to suit the image I was using.
I began by cutting the aperture with a die which I bought from a French company called Simply Graphics. Isn't it delicate! The flowers were cut (using a die by Alexandra Renke) from a piece of card which I had coloured by smooshing with some purple inks with a little platinum Inka Gold. I popped a tiny, tiny  gem into the centre of each of them. 
To get the sentiment just where I wanted it, I  die-cut a piece of copy paper with the aperture die. With my Word programme set to 105%, the size of the page on my screen matches a piece of A4 paper. So by putting the lines of text into text boxes and making them transparent, I could jiggle them around so that when the die-cut piece of paper is put over my screen, I can see if the positioning is correct. It's a bit Heath Robinson, but it works for me.
I thought that this card would work well for the challenge at Less is More
This time it's Shades of Purple.
This is the challenge which I created with Mandi in 2011 and I am simply thrilled that since stepping back, the tradition of wonderful CAS designs has continued with the fabulous bunch of designers.
Thank you girls for all the wonderful inspiration! Long may you continue to inspire!
 

Sunday 13 September 2020

Feliz Navidad


I'm really fond of these trees, I don't remember if they're Simon Says Stamp or Memory Box, but the shape really appeals to me.
I took the idea of cutting the front section into thirds from Just Us Girls

Anything Goes

...but I started with the idea of making a second card with the trees after seeing Darnell's latest Twofer Challenge


Both cards use the same stamp set from Mama Elephant, the same Embossing Folder from Sheena Douglass and the same tree die, so I'm not sure if they fulfil the criterion of being 'different'! I find Darnell's challenges really tricky... maybe I have a one track mind and once I've come up with and idea for a stamp or die, find it difficult to deviate... 'til the next time I use it!

Time to go for our daily walk, trying to walk off the effects of the lockdown cocktails!

Saturday 12 September 2020

Thanks so much


HAving seen the challenge from CAS Mix Up, I have spent quite some time messing around with various techniques which were completely new to me!
This card is the result of one of those endeavours.

I have embossed with dies many, many times, but never quite like some of the ways which I have been trying today.
I used a 'Hessian' Embossing Folder from Crafter's Companion, together with a matching stamp and die from Clearly Besotted. 
The die needs to have a flat back (and be pretty symmetrical). The flat side of the die is placed onto the raised side of the Embossing folder. The card to be embossed is laid on top and leaving the embossing folder open, the sandwich is topped with a rubber mat and the top plate of the die-cutting machine.
Once embossed, the flat area left by the die can be stamped with its matching stamp. The need for symmetry is because normally the stamp would line up with the cutting side of the die, not the reverse!
I used my stamping platform  to try to get the stamp as closely aligned as possible and inked with a BIG and Juicy variegated ink pad, applying the ink with a brayer as the ink pad is too large to apply directly with ease.
The sentiment is from  Avery Elle.
Once more thanks to the girls from CAS Mix Up for more great inspiration!
This was fun!


Friday 11 September 2020

White Christmas


Here are two of my favourite 'go to' items for Christmas cards, my Sheena Douglass 'Snow ' Embossing folder and I think it is a Memory Box Christmas trees die. When I spotted this sentiment in a set in my stash from Mama Elephant, I thought that as I was making a white on white card, it would be a real tongue in cheek thing to add!

I had three challenges in mind when making this card.


S for Snow

I still find this new Blogger a pain 😏, in fact I haven't used it much, which is probably why I'm still somewhat in the dark as to its potential or even its everyday use. My card making itself has dropped off somewhat recently, playing second fiddle to a renewed interest in sewing. 
I wonder how long we will have to continue with our current regimes, it seems incredible to me that the whole world is in a similar state!
Stay safe everyone.