Pages

Monday, 24 February 2020

Red & Black

On several of the cruises that I have been lucky enough to take, there have been some watercolour classes. These happen on sea days  and sometimes it's difficult to decide just what to spend one's time doing. On the last cruise I did, the watercolour class definitely won, as problems with my knee meant the line dance class was no competition! Having said that,... classes DO help, but they don't make up for lack of talent. I learned a few techniques, but applying them is a whole other matter.
Here I used an old stamp from Magenta, on watercolour paper and clear embossed the outline. I wanted the vase to look shiny! I mixed a little red and grey and dropped the colours onto the petals and leaves respectively and tapped a few splats over the whole image.
The sentiment is from Clearly Besotted, die cut from the watercolour paper and stacked several times over black die-cuts, which adds a little to bothe the dimension and the effect.
This weekend I acquired a new stamp platform. This one avoids the need for adding or removing the foam sheet adapter to accommodate  cling or clear stamps. It has a spring mechanism which means that you just push it down further to stamp the clear stamps. It also has no edges so that larger pieces of card  can also be accomodated. It comes with two magnets which are already in little holders which makes moving them around a much more simple operation!
SO far I'm delighted!

Sunday, 23 February 2020

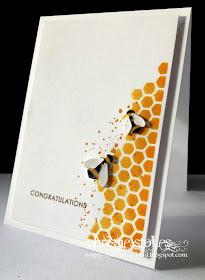
Congratulations

Something very strange happened!
I completed this post and published it... having linked it to the challenges it was created for. Today only the card is apparent, with no text whatsoever.
Many thanks to Loll for visiting  pointing out that lots was missing!
SO.... I made a stencil from vellum and  a Memory Box die. I sponged through Distress Inks in WIld Honey and Spiced Marmalade, then overstamped with an old stamp from SU's (long since retired) Gorgeous Grunge set. The bees are also from Memory Box and are the fiddliest things to assemble! They are cut from white card, then coloured with alcohol markers and topped with Nuvo Crystal Glaze. The sentiment is from Sugar Pea Designs.
The challenges I'm linking to are ...


It's a total mystery to me as to where the text from my original post went to... technology will never cease to astound me!

Saturday, 22 February 2020

Greater Joy


Here I used the same sentiment file as on my last card, which a made on my Silhouette. This time I made it much larger and in red glitter card. I cut a couple of layers in plain card which I stacked to add dimension. For a while I thought that the glitter card was too thick or tough or whatever to cut with my Portrait, but I discovered that the small component around the blade had become slightly unscrewed so that not enough of the blade was showing, despite it being on a high setting. Once I discovered and remedied  this situation it cut beautifully!
The background was cut with a Memory Box die gently twinkled with Glamour Dust and the backdrop embossed with Sheena Douglass Snow embossing folder.
CASology - Tall


My knee seems to be progressing well, it is still sore but my walking is much better now!

Monday, 17 February 2020

Joy


Following my knee surgery on Friday last, I am hobbling around, but it's not too painful thankfully. I didn't enjoy changing the dressings however, as there was some sticky stuff rather close to the incision site and  my skin hurt more than the joint when I was removing it. Loads of surgical spirit was needed! Thanks to everyone for your good wishes.
This card is for the challenge at CAS Christmas

It's funny but if I get an idea into my head I really have to go for it and after wanting to do something like this, I realised that I didn't have a 'joy' die which was either the right style or dimensions for what I had in mind. So I made this on my Silhouette. I cut out two and stacked them before embossing with a layer of Gold Twinkle embossing powder then a layer of UTEE. It's mounted on dimensional pads.
The die cut wreath is a stack of three cuts twinkled with Glamour Dust. A simple de-bossed frame finished it off!

Friday, 14 February 2020

What is the plural of rhombus?


I guess we could get into quite a discussion here... rhombuses or rhombi? Whatever the answer,
there are quite a few of them in this card, or rather they are absent but we can see where they were!
The trellis die is from Memory Box, cut from a simple panel and with just a couple of die cut sprigs of eucalyptus cut from a piece of photographic paper, which had been coloured with alcohol inks.
The foliage die is by Alexandra Renke and the sentiment stamp from Clearly Besotted.
It's my DT card for the challenge at Perfectly CAS, where the decoration must not take up more than a third of the front of the card. In other words we need to see lots of white space!
As you can see, the challenge is to include SHAPES!
DO join in the fun!
Today I am having an arthroscopy on my knee, something that has been needed for about 2 years, let's hope it will be successful! It's just day surgery so I'll be hobbling around at home again tomorrow!

Wednesday, 5 February 2020

I'll be your sweetheart


I seem to remember many moons ago that my dad used to sing this to me when I was tiny... and the thought brings a smile to my face.  He died in 1961 when I was just 16.
I love this dear little bear from Penny Black. I simply stamped, embossed and coloured him with alcohol markers then cut him out and added a little twinkle to the heart, then popped him onto some dimensional pads.
The sentiment was computer generated using Cheryl font.


Tuesday, 4 February 2020

9 Geese a-layiig


I love these Penny Black creatures. Isn't this goose jushis iine is for the challenge at HLS Christmas where the theme could include Christmas Wings, although as ever Anything Goes!

This is simplicity itself, I did add a panel to the front of the card as I used Copic pens to colour the image,  and even though it is only a small amount, it would show through to the inside of the card. This young lady makes me smile just to look at her!
It's such a great idea to spread the making of Christmas cards throughout the whole year to save the mad scramble to get enough done at the last moment.
So why not join us!
You may have noticed the typo in the title.... the wrong number and a spelling error... I didn't notice until after I had created the permalink for the Happy Little Stampers blog, so if I alter it now the permalink won't work...  So I'll apologise right now... SORRY!

Sunday, 2 February 2020

Positive


The challenge at HLS CAS this time has the word POSITIVE as the inspiration!

This time I decided to do both Positive and Negative. I used a stamp from Hero Arts, which I  stamped and heat embossed in black on white card and stamped and heat embossed in white on black  card, then I cut each piece and half and put halves of each colour together. I used a twinkly black embossing powder on the white card. The sentiment too is a mix of black and white and I distressed the edges slightly. The joy of this technique is that you end up with two cards.
The challenge may spark a totally different meaning of POSITIVE for you, why don't you join us!

Fun with stencils


Those gals over at CAS Mix Up certainly keep us on our toes. The task this month is to create a stencil from a die cut.

In fact the card which I made for the challenge at CAS Stencil last time would have fitted for this challenge too!
I'm very fond of creating stencils with my dies, particularly when using embossing paste as it reduces on clean up time as I just toss out the stencil, which I cut from vellum. However this time I decided not to use embossing paste (maybe that will come later) but to use gilding flakes.
Firstly I cut the stencil from vellum using a Sizzix die. Once cut, I taped it to a piece of black card and stamped over the die cut part with Versamark. After lifting the stencil, I sprinkled on some Stamp 'n' Bond and melted it with my heat gun. I added some gilding flakes and burnished them with a  scoochie or whatever it is they call those funny little pad thingies. I chose a die by Alexandra Renke, which I think echoes the shapes of the background, (to make the focal point) and stamped a simple sentiment.
Addicted to Stamps and More