Pages

Sunday, 17 March 2019

CAS Christmas

There's still time to join in the fun over at the CAS Christmas Challenge where the theme this time is Deer!

Here I limited the colour palette to just two colours... white and navy. I used a circular die from Simon Says Stamp and added a backdrop piece of card coloured with Chipped Sapphire Distress ink applied via Sheena Douglass's Snow Embossing Folder. I inked the inside, flat side of the folder and ran the card through my Big Shot.
The sentiment from Cutplorations and the stag from Sizzix (which I have since misplaced Grrrrrr!) were simply layered and added to the front of the card.

It's such a good idea to prepare Christmas cards at leisure throughout the year, as for many years I've had a mad scramble to get enough cards made at the last minute.
Hopefully it will work well again this year!

Many thanks once more to the team at CAS Christmas for this wonderful invitation to join them!

Spring Flowers

It's always a little tricky when colouring a one layer card, as it looks horrid if the colour transfers to the inside of the card, which is why I have used watercolour here. Some times I use watercolour pencils and a brush and sometimes I use paints... here I used a combination of the two. I wasn't too pleased with the colours I had used from the pencils so I added a little warmth from the colours in my little paintbox.
The stamps are from Penny Black.
There's something a little odd about the bucket... There's a line around the back of the flowers which I think is supposed to be the rear  rim of the bucket, but the perspective is all wrong to my eye, so I ignored adding colour to the inside of the bucket as I thought that it would accentuate this anomaly!
The Paper Players - One Layer
Crazy for CAS - Watercolour
Addicted to stamps and More - Make your mark
Ike's World - Clean and Simple
Papercraft Challenges - Clean and Simple

Snowdrops


It's a while since I used a digi image for one of my cards, but this is a favourite of mine from Fred She Said, Spring flowers are so delicate looking and these tiny snowdrops look beautiful. It's simply water coloured with a dash of Glamour Dust added to the petals. The sentiment was computer generated using Andalus and Alex Brush fonts. The front panel was cut with a Creative Dies die.
Mother's Day is celebrated in March in the UK unlike the US where it takes place in May. I have many friends from my choir who are particular about calling the special day "Mothering Sunday". It refers back to the time when servants in large houses were allowed to return home for one special day to visit and take a small gift to their mothers. Normally their work work be seven days per week!
Working in service is far less popular these days, as most of the help we have in our homes comes via other means...central heating, dishwashers, washing machines and dryers etc!
Back in the day, I think I would have been the one scrubbing the floors rather than having them scrubbed for me!
AAA Cards - Spring
Krafty Chicks - Shades of green
ElliBelles Corner - Think Spring... add some Green
Always fun Challenge - Add some Green
Addicted to CAS - Green

Friday, 15 March 2019

Snippets

It's difficult to see from this picture but the ink of the sentiment and the ribbon are in a deep shade of purple... chosen to tie in with the lilac of the spotty paper. Just about everything in this card has been in my craft room for years. When I first started crafting, I used lots of papers. some of which I printed myself as here. This is from the remains of a sheet from Pink Petticoat.It was curled up at the edges and stained with ink in places but for a couple of die cuts it looks pretty good. The ribbon has been sculling around for years and I think it actually came from a box of chocolates. The dies are from Sizzix and the sentiment from Clearly Besotted. The ink used for the sentiment is Concord Crush from Stampin' Up.
I based it on the sketch from Freshly Made Sketches
The Flower Challenge - Anything Goes

Using old dies

I have heaps of stash which simply sits in boxes, files or drawers and rarely sees the light of day. One such is the die which I used to cut the lacy panel on this card.
I store my dies on magnetic sheets in slim plastic box type folders which hold about 8 sheets. They are filed in a variety of ways... Butterflies, Hearts, Babies, Tags & Labels, Foliage, Flowers, Large & Border Dies, Stitched and Pierced dies, Creatures, Sentiments, Alphabets.. I could go on, I must have thousands of dies!!!
What I was looking for today was a die which cut a pattern in a front panel without cutting it completely apart. This is what I found and I'm afraid I no idea of its origin and I can't even remember if I've used it before. Anyway I think it looks quite pretty, however as it is quite intricate I found it difficult to find something to complement it! This little bunch of hearts stems from Impression Obsession  ( I scribbled the make on the back of the die with a Sharpie during a moment of enlightenment) seems to fit reasonably.
The sentiment is from Clearly Besotted I believe. I usually write the make of sheets of clear stamps on the carrier sheets if the manufacturers haven't already done so.
Foolishly I assembled the card before adding the sentiment, but as I had used strips of dimensional pads to elevate the front panel a little instead of just dots, I managed to stamp the sentiment is my MISTI.


Wednesday, 13 March 2019

More vellum

I have to say that the CAS Challenges managed by Loll and Bonnie, certainly do just that... challenge! However there is so much inspiration together with links to videos to help with new techniques that it really is a terrific place to have fun!
This is another attempt for their watercolour challenge, which is to use watercolour on vellum.
In the first card I entered, I coloured on the back of the vellum, this time I coloured on the front.
This is from an old wood mounted stamp from Magenta. It had been sitting in a drawer for quite some time and when I first stamped it, part of the image was missing,  I guess it had got a little squashed. So to be able to double or triple stamp in order to ensure I got a good image, I decided to take it off the block to use in my MISTI. After a few seconds in the microwave it came off easily and in the MISTI worked beautifully. I embossed it in gold and coloured using the little box of paints which I bought for the art class on my last cruise.

I think the sentiment is from Clearly Besotted. It was quite a game trying to find stitched dies to cut out the sentiment. Having done the white piece of card, I wanted a really slim surround in the black card. With a little trial and error and a bit of jiggling to reduce the size of the second die cut, I managed to get the effect I wanted.

Greens


A funny thing happened on my blog the other day!
When I first set up my blog many moons ago, I added a gadget on my sidebar called Crafty Blogs. It gives you an idea of the amount of traffic visiting your blog. (lots of people visit to have a look  but don't leave comments, so you don't actually know they've been around.
It appears that my blog is usually fairly well visited and the number appearing on the gadget is usually between about 60 and 90. (Number 1 being the most popular of all) Not bad considering the number of blogs there are around!
The other day however the number was 287 or something like that! I find it really hard to understand how that drastic fall in popularity could happen overnight. Since then the number has been gradually climbing until it is now round about back to where it historically had  been.
Has anyone else had something similar happen?
What would be even better is if visitors could drop me a comment to say they have been and what they think of my cards!!
Anyway to get back to this one.
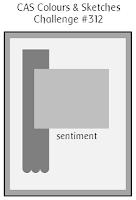
I based it on the sketch from CAS Colours and Sketches
I used the Ghosting technique with a Stamplorations Stencil on the pennant, adding a die cut  and water coloured foliage spray from Sizzix. The sentiment is from Personal impressions. The two pennants were cut with MFT pierced dies.


I guess that quite a lot of the earth is coloured with various greens!
Sunday Stamps

Monday, 11 March 2019

Tulips


There's something about monochrome cards which I find rather pleasing. This is simplicity itself. I stamped an Impression Background Manuscript stamp in Soft Slate, to pop a section behind this circular aperture. I cut the flower dies in two shades of card and inserted the cut outs of the grey card into the white frames, Just for the heck of it I put just one white insert into the larger flower. Actually I couldn't find the grey bit amongst all the detritus on the floor and on my desk, I could easily have cut another but in fact I quite like the look. The sentiment is from Personal Impressions, stamped with a slightly darker grey than the background stamp (to give a little more definition) and cut with an extended  pennant die, with the tails cut off one end.
Just us Girls - Use a Background Stamp
The Flower Challenge - Anything Goes

Sunday, 10 March 2019

More Ghosting technique

Here I have used both the same technique and the same layout as on my previous card. This time I inked a piece of card with Black Soot Distress Ink using a sponge dauber. After laying the Tim Holtz Music Manuscript stencil over the card I spritzed lightly with water and  after lifting off the stencil, dried the card with my heat gun. The effect is subtle and I rather like it. The die cut over the ghosting is from Pink Fresh Studios. The sentiment is from Personal Impressions.
The butterflies sadly were an afterthought... I had just about completed the card when I saw a tiny dot of something or other... maybe a little ink... anyway it couldn't stay and wouldn't go, so a couple of butterflies miraculously flew along to help me out of my difficulty!
This is another contribution for the challenge at CAS Stencilling - Ghosting

Inspire Create - Sketch
No photo description available.
I have just ordered a whole bunch of stuff for my granddaughter who has just started Baby Ballet... she is two and a half and has been trialling the lessons for a couple of weeks, she seems to be enjoying it so let's hope she wants to continue. I'll post a pic of her in her finery as soon as it arrives!

Saturday, 9 March 2019

Ghosting


For this technique, I used several shades of green Distress Inks daubed randomly on plain white card. I laid a Maidenhair Fern stencil over this and spritzed with water from fairly high up, to give a fine mist. I lifted the stencil quickly from the card and allowed to sit for a few moments before drying it off with my heat gun.
The flower cluster die arrived today from Simon Says Stamp and it think it complements both the shape of the die cut and the ghosted image.
I cut the white background piece of card with a  large square die, cutting a partial circle from it and trimming it to a rectangle shape and embossing the cut edge with an embossing stylus against the edge of the Spellbinder dies. The stitched circular die is from SSS.
I chose a small sentiment from Lili of the Valley which I cut after stamping using a stitched pennant die, shortening it considerably to fit the length of the two words.
CAS Stencil - Ghosting

I used the sketch from Inspire Create
No photo description available.

Wednesday, 6 March 2019

Birthday flower

I love this pretty flower stamp and die set from Simon Says Stamp. 
I stamped the flower onto vellum and clear embossed it in silver before die cuting and colouring on the back using alcohol markers. I added a few tiny gems to the centre of the flower and attached a couple of vellum leaf sprays behind it.
The background stencilling was made from  a Memory Box die which I cut from vellum and then used as a stencil. I sprinkled a few grains of red and white Brushos over the stencil and then spritzed with water before dabbing dry with a paper towel.
A few additional gems and a silver embossed sentiment from SSS completed the card.
Just Us Girls  - Birthday
CAS on Friday - Use Vellum
Inkspirational - Use Your Stash
I've had this grey card used for the base for years. It was purchased from a Papermill shop many years ago and all the shops have long since closed down, I'm still slowly working my way through boxes of coloured card!
The flower challenge - Anything goes

Monday, 4 March 2019

HLS Christmas Tag


The March Challenge for the Christmas card section of Happy Little Stampers is as ever... anything goes but has the optional twist of adding a tag!

This tiny Santa is a first time out for me, from a set from Sizzix. The pieces are absolutely miniscule!!!!! As I had added some DST to the back of the card before cutting, I merely had to round up all the tiny pieces and stick them on! If it was not for a pokey tool, the task would have been impossible! However I think he looks quite fun.The tree is from a Simon Says stamp die and the textured strip from an Embossing folder by Sheena Douglass.
This morning I 'misplaced' a little deer die from Sizzix... I had cut out a few and when I wanted it again, it was conspicuous by its absence. It irritates me more than somewhat when I can't find things, but hopefully it will be hiding in plain sight somewhere! Let's hope it turns up... it was the best image from the set!
Last year making Christmas cards throughout the year proved to be a great success for me as I wasn't faced with the prospect of producing heaps of cards in a very short time. Let's hope it works as well again this year!

Another triple embossed leaf

here is another triple embossed leaf which I made a little time ago. This time I have gone with darker shades and mounted it on Hessian on a kraft backdrop. The colour of card used for the berry spray picks up some of the colour in the leaf.. probably from the Perfect Pearls which I used to add colour to the embossing. The sentiment die is from Crafter's Companion, and I used the colours of the card base and back drop for this. The kraft card is rather flimsy, I'm not sure of the weight but it needed a more sturdy base to support it!

I used the sketch from CASe this Sketch, I love the simplicity of it!
Allsorts Challenge Your favourite season - Autumn 
Inkspirational - Use Your Stash (I've had the hessian and the gems for yonks )

Sunday, 3 March 2019

CAS Christmas Guest Designer


I was fortunate to have one of my cards selected as the winning submission in the Challenge at CAS Christmas. With this win came an invitation to join them as Guest Designer for one month.
This is that month and here is my first card.
 

As you may see the focus this time is the keyword Deer!

My card consists of simply 2 stamps, an image from Stampin' UP and a sentiment from Penny Black both embossed in Gold on a black base. The front panel has been popped up onto dimensional pads, to add just a little definition to the design.

The team at the CAS challenges are an amazing bunch of designers and so much inspiration is to be had over there, so do go and take a peek and join in the fun!
This is another submission for the Male room - No Designer papers

Macintosh Window


Here is another technique for Faux Stained glass. I'm not sure if this is a recognised technique but I thought that I would try  and see if it worked. 
I stamped my Chocolate Baroque circle stamp onto vellum using Versafine ink and clear embossed it. Then I inked all over the image once more with Versamark and clear embossed that. (To give the effect of glass hopefully.)
The next stage was to use my waterbased markers from SU to colour the back of the image. I used a couple of shades of green, pink and pale blue for this. It took me a while to go through my stash to find a birthday greeting which was in a suitable font to tie in with the image. I found this among a set from Happy Little Stampers. I think is works well.
I made the front panel for the card using stitched dies from SSS and MFT. The rectangle panel was made with a square die extended a little to fit my card base.
I popped the panel onto dimensional pads to allow a little light to get behind the window.


It's for the  Challenges at CAS Mix Up and CAS Watercolour


Just Us Girls - birthday
Now to get Sunday lunch started!

Large flower

Here is another card ith the same technique as the Faux Stained glass. This time I used white for the top layer instead of silver and added a simple heat embossed sentiment from WOW.
The die cut was coloured with Promarkers, the I added some Glossy accents to just the centre of the flower, after which I poured on some Micro Glass Beads top add a little texture.

Once this was done, I added Glossy Accents to the rest of the flower, before building up several more layers of the flower outline once the liquid had set.
It's another contribution for the CAS Mix Up Challenge.